Showing posts with label Rest API. Show all posts

Thursday, 24 May 2018

Callouts from a Visualforce Page | Continuation | Asynchronous callouts from VF page


Most of the time got the requirement to do callout from VF page button. We can do the same with the help of Continuation method. An asynchronous callout is a callout that's made from a Visualforce page for which the response is came back through a callback methodology. An asynchronous callout is additionally referred to as a continuation.


(This Image is from Salesforce documentation)


Apex Class:-

public class AnimalsCallouts {

    // Unique label corresponding to the continuation
    public String requestLabel;
    public String result {get;set;}
    public List<Object> animals {get;set;}
    
    public AnimalsCallouts(){ 
        animals =new List<Object>();
    }

    
    public Object  makeGetCallout() {
        Continuation con = new Continuation(40);
        con.continuationMethod='processResponse';
    
        Http http = new Http();
        HttpRequest request = new HttpRequest();
        request.setEndpoint('https://th-apex-http-callout.herokuapp.com/animals');
        request.setMethod('GET');
    
        // Add callout request to continuation
        this.requestLabel = con.addHttpRequest(request);
        // Return the continuation
        return con; 
    }
    
    public Object processResponse() {  
        HttpResponse response = Continuation.getResponse(this.requestLabel);

        // Set the result variable that is displayed on the Visualforce page
        if (response.getStatusCode() == 200) {
            this.result = response.getBody();
            Map<String, Object> results = (Map<String, Object>) JSON.deserializeUntyped(response.getBody());
            animals = (List<Object>) results.get('animals');
        }
        return null;
    }
        
}


NOTE:- Dnt forget to add Remote Site Setting for your URL.

Visual Force Page:-
<apex:page controller="AnimalsCallouts">
    <apex:form >
        <apex:pageBlock >
            <apex:pageBlockButtons >
                <apex:commandButton action="{!makeGetCallout}" value="GetCall" reRender="detail"/>
               
            </apex:pageBlockButtons>
            <apex:pageBlockSection id="detail" columns="1">
                 {!result }
                 <BR></BR>
                 <apex:pageBlockTable value="{!animals }" var="an">
                     <apex:column value="{!an}" headerValue="Response"/>
                 </apex:pageBlockTable>
                
            </apex:PageBlockSection>
       
        </apex:pageBlock>
   
    </apex:form>


</apex:page>


Output


If you want to learn about REST API check below post
http://amitsalesforce.blogspot.in/2017/01/learn-rest-api-in-salesforce-how-to.html


Thanks

Amit Chaudhary
@amit_SFDC


Sunday, 13 May 2018

REST API with XML and JSON | REST API with XML Payload | REST API with Dynamic Response

Issue:-
Recently i got one requirement to create one REST API which should support JSON and XML both. If we will pass JSON request body then response should come in JSON. But if we will send request body in XML then response should come in XML.

Solution:-
So here is solution :)

Global class REST_API_Helper{     public static blob formatResponse(ResponseBase ResponseBaseObj,String contentType){         String response;         String strContectType = contentType.toUpperCase();         if(strContectType.contains('XML')){             response = serializeRespinseBaseXml(ResponseBaseObj);         }             else {             response = JSON.serialize(ResponseBaseObj);         }         return blob.valueOf(response);     }     /*     *************************************************************************     * @description: This function is used to send the response in XML     * @return: string       *************************************************************************     */      public static string serializeRespinseBaseXml(ResponseBase ResponseBaseObj ){         String responseXML = '';         responseXML  += '<response>';         XmlStreamWriter w = new XmlStreamWriter();         w.writeStartElement(null , 'Message', null );         w.writeCharacters(ResponseBaseObj.Message);         w.writeEndElement();                  w.writeStartElement(null , 'Success', null );         w.writeCharacters(String.valueOf(ResponseBaseObj.Success));         w.writeEndElement();         responseXML += '</response>';         String xmlOutput = '<?xml version="1.0" encoding="UTF-8"?>' + '<Response>' + w.getXmlString()              + '</Response>';         w.close();         return xmlOutput ;     }     global class ResponseBase {         global Boolean Success {get;set;}         global String Message  {get;set;}         global ResponseBase(){                 success = true;                 message = 'Records are updated';         }     } }


@RestResource(urlMapping='/api/*/createContact')
global with sharing class RESTAPI_JSON_XML 
{
    @HttpPost 
    global static void doPost(ContactDetail  Detail) {
    
        RestResponse standardResp = RestContext.response;
        REST_API_Helper.ResponseBase  CustomeResponse = new REST_API_Helper.ResponseBase(); 
        ContactDetail reqBodyObj = Detail; 

        RestRequest req = RestContext.request;       
        String ContentType = RestContext.request.headers.get('Content-Type') ;
        
        Contact cont = new Contact();
        cont.FirstName = reqBodyObj.FirstName.trim();   
        cont.LastName  = reqBodyObj.LastName.trim();
        insert cont;
        
        CustomeResponse.Success = true;
        CustomeResponse.Message = 'Contact Created id ='+cont.id;
        standardResp.statusCode = 200;
        standardResp.responseBody = REST_API_Helper.formatResponse(CustomeResponse,ContentType); 
            
    }

    global class ContactDetail{
       global string FirstName {get;set;}
       global string LastName  {get;set;}
       public ContactDetail()  {}
    }
}


Sample JSON Example:-
Method:- Post
URL:- /services/apexrest/api/*/createContact
Request Body
{
   "Detail": {
                "FirstName":"Amit",
                "LastName" :"Chaudhary"
         }
}


Sample XML Example:-
Method:- Post
URL:- /services/apexrest/api/*/createContact
Request Headers:-
Content-Type: application/xml; charset=UTF-8
Accept: application/xml
Request Body
<?xml version="1.0" encoding="UTF-8"?>
<request>
    <Detail>
        <FirstName>566788</FirstName>
        <LastName>V00001397450513</LastName>
    </Detail>
</request>

Response :-
<?xml version="1.0" encoding="UTF-8"?><Response><Message>Contact Created id =0039000002SMSFJAA5</Message><Success>true</Success></Response>


Wednesday, 21 June 2017

Test Salesforce API by Postman Rest Client | Postman and Salesforce | Calling APEX Rest service using Postman| OAuth 2.0


Force.com platform support powerful web services API for interaction with external app and salesforce.com . For secured interaction with third party app, Salesforce enforces authentication process.


Above image is picked from here.

If you want to configure the same the help of recording. Click here for recording.

Step 1) Connected App for OAuth

To perform OAuth in salesforce, you must create Connected App in salesforce

Follow below step to create connected App.

1) Click on Setup->Create->App


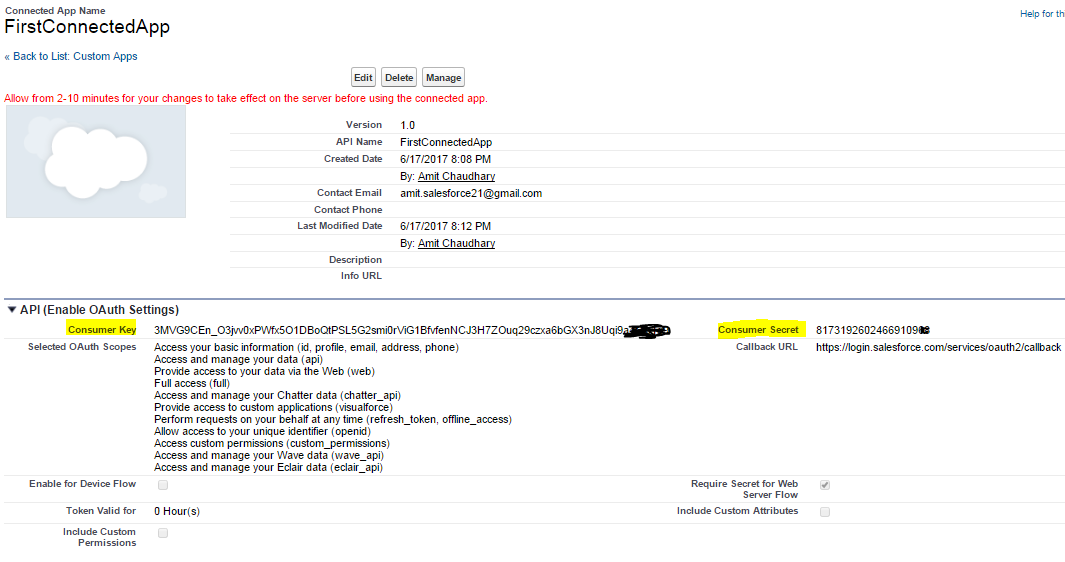
2) Then from above screen click on Connect Apps then New button. Then add all required information like below


 3) Now After creating connected App we have consumer key and consumer secret


Step 2) Create a REST API in salesforce.

Please check below post for REST API
1) Learn Rest API in salesforce | How to learn Rest API | Rest API in salesforce
2) Rest API in Salesforce | Execute Rest API on workbench | Test class for Rest API

Sample code to Start


@RestResource(urlMapping='/api/Account/*')
global with sharing class MyFirstRestAPIClass
{
@HttpGet
global static Account doGet()
{
RestRequest req = RestContext.request;
RestResponse res = RestContext.response;
String AccNumber = req.requestURI.substring(req.requestURI.lastIndexOf('/')+1);
Account result = [SELECT Id, Name, Phone, Website FROM Account WHERE AccountNumber = :AccNumber ];
return result;
}

@HttpDelete
global static void doDelete()
{
RestRequest req = RestContext.request;
RestResponse res = RestContext.response;
String AccNumber = req.requestURI.substring(req.requestURI.lastIndexOf('/')+1);
Account result = [SELECT Id, Name, Phone, Website FROM Account WHERE AccountNumber = :AccNumber ];
delete result;
}

@HttpPost
global static String doPost(String name,String phone,String AccountNumber )
{
Account acc = new Account();
acc.name= name;
acc.phone=phone;
acc.AccountNumber =AccountNumber ;
insert acc;

return acc.id;
}

}

Step 3) Get Access Token by POSTMAN

  3.1) Install the postman from here.

  Download URL :- https://www.getpostman.com/

  3.2) Generate URL

  OAuth Endpoints in Salesforce
  Authorization
: https://login.salesforce.com/services/oauth2/authorize
  Token Request: https://login.salesforce.com/services/oauth2/token


  There are two way to get Access token
  1) By Post Callout (Direct URL)
  2) By OAuth Setting in POSTMAN (Wizard one)

  3.2.1:- By Post Callout (Direct URL)

  Use below link to Generate the Token for accessing SFDC

https://na50.salesforce.com/services/oauth2/token?grant_type=password&client_id=***Consumer Key_Here***&client_secret=***Consumer Secret_Here***&username=*********&password=*****password+securityToken******


NOTE:-   May be After try to login you will get below error "Failed: Not approved for access"


     Please check below post to resolve this issue
    1) https://help.salesforce.com/articleView?id=000212208&language=en_US&type=1
    2) http://amitsalesforce.blogspot.com/2017/06/failed-not-approved-for-access-in.html
  

  Finally We have Access Token

  3.2.2:- By OAuth Setting in POSTMAN (Wizard one)

  •   Select Type OAuth 2.0

  • Then click on  "Get Access Token". Then provide all below detail.

  • Then click on Request Token button. Then it will ask you to enter userName and password.


  • Here we have Access Token


Step 4) Test APEX REST API. 

Now Copy the Access Token from above Screen. Add below detail to make get call


a.       End point URL: https://na50.salesforce.com/services/apexrest/api/Account/12345
b.      Select method as ‘GET’
c.       Put the details in header as below:
Authorization: OAuth + Access Token


Or you can try like below as well.


Now Copy the Access Token from above Screen. Add below detail to make get call


a.       Click Add Token to "Header"
b.      Then select "Use Token"
c.       Then select Get Method and add below URL
https://na50.salesforce.com/services/apexrest/api/Account/12345


Please check below recording for end to end POSTMAN setup


Check this post to learn about how to configure SoapUI to run SOAP API Calls.


Related Post
1) Apex REST Basic Code Sample
2) Rest API
3) Understanding the Web Server OAuth Authentication Flow

Please let us know if this will help you

Thanks
Amit Chaudhary

Sunday, 18 June 2017

Failed: Not approved for access in salesforce


After entering credentials and attempting to login to Salesforce, the API user is denied access to the application and is typically accompanied by a Login History Status of "Failed: Not approved for access".


Solution:-

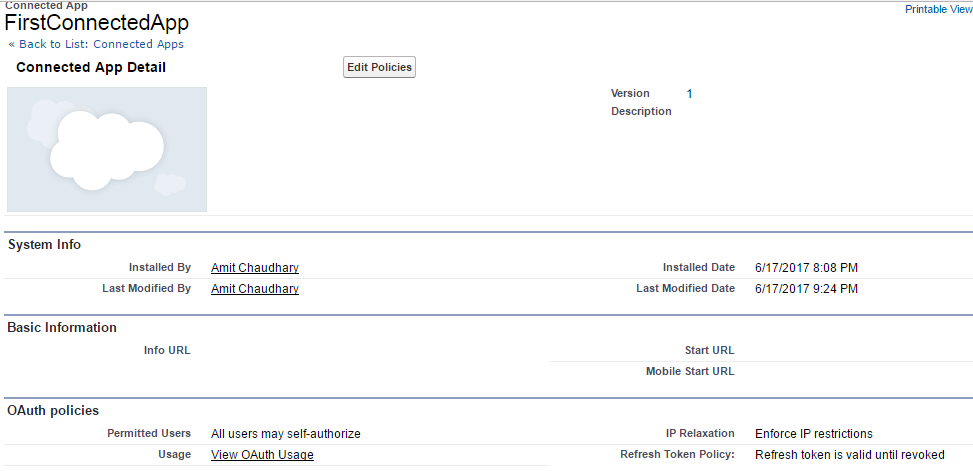
Update  OAuth policies and set Permitted Users to "All users may self-authorize".

Step 1) Open the connected App the click on Manage button.


Step 2) Then click on Edit policies button


Step 3)  then update "OAuth policies"


     Please check below post to resolve this issue
    1) https://help.salesforce.com/articleView?id=000212208&language=en_US&type=1


Thanks
Amit Chaudhary

Wednesday, 11 January 2017

Learn Rest API in salesforce | How to learn Rest API | Rest API in salesforce


REST API
The Salesforce REST API lets you integrate with Salesforce applications using simple HTTP methods, in either JSON or XML formats, making this an ideal API for developing mobile applications or external clients. Salesforce also supports Apex REST, which lets you create Web services on Force.com using Apex


Please check all below post to learn about REST API with example.


1) Apex Integration Services
Now learning in salesforce to much easy as compare to our time. The Salesforce Trailhead now offers a fun way to learn everything related to Salesforce Integration and Rest API

2) Insert | Update | Delete record by Rest API | Workbench | Standard Rest API | Rest Explorer 
In Above post you will learn how to insert, update or delete a record by Rest API without any code 


3) REST Explorer | Using Workbench | Execute API from Workbench 
The best way to test your web-service is workbench. The browser based workbench does not require OAuth as long as your browser session is active. Above post will help you to learn about Workbench. 


4) Access Token Generation | OAuth 2.0 | Connected App | Rest API Access Token 
This post will help how to Generate OAuth token to execute the Rest API 


5) Rest API in Salesforce | Execute Rest API on workbench | Test class for Rest API 
 Above post will help you How to create Rest API code in Apex classes with Test class. In above you can found the sample code and can see how to execute same API in workbench.


 6) REST API | New Resources | Summer 15 | Composite Resources in Salesforce 
In this post we will learn about Batch resource. The Batch resource lets you execute a sequence of independent subrequests. For example, you can update the name on an account and get the account’s field values in a single request


7) Test Salesforce API by Postman Rest Client | Postman and Salesforce | Calling APEX Rest service using Postman| OAuth 2.0

Please check below for how to call REST API from postman and how to do salesforce API end to end testing


8) REST API with XML and JSON | REST API with XML Payload | REST API with Dynamic Response

 REST API which should support JSON and XML both. If we will pass JSON request body then response should come in JSON. But if we will send request body in XML then response should come in XML.

9) Callouts from a Visualforce Page | Continuation | Asynchronous callouts from VF page

How to do Callout from VF page button


Thanks
Amit Chaudhary