Showing posts with label Mix and Imp. Show all posts

Friday, 14 October 2016

Sales Cloud and Service Cloud


Sales Cloud :-
“When we develop product in force.com for sales then it comes in Sales Cloud Ex: - Account, Contacts, and Lead”. In different Words “ we are able to say that The Sales Cloud from salesforce.com is that the world's #1 sales application. It provides reps, managers, and execs everything they have to attach with customers and focus on what is important —more selling and fewer administration. It helps you close a lot of deals - quicker, gain period of time visibility into sales, and connect with today's social customers”.


Service Cloud :-When we need to supply some facility and additionally provides support to the clients then it comes in service Cloud. Ex: - create cases is that the example of Service Cloud within which consumer write his problem into cases rather than decision.

In different words “In service cloud when we sales product to consumer then we provides the various different types of facilities to consumer which will be helpful to consumer just like call center. In call center ,client will create a decision and ask his problem regarding product and might notice the higher answer about his problem“.


Difference between Sales Cloud and service Cloud:-

1. "Sales Cloud" refers to the "sales" module in salesforce.com. It includes Leads, Accounts, Contacts, Contracts, Opportunities, Products, price books, Quotes, and Campaigns (limits apply). It includes options like Web-to-lead to support online lead capture, with auto-response rules. it's designed to be a start-to-end setup for the entire sales process; you utilize this to help generate revenue.

While “Service Cloud" refers to the "service" (as in "customer service") module in salesforce.com. It includes Accounts, Contacts, Cases, and Solutions. It additionally encompasses features like the public knowledge base, Web-to-case, call center, and the Self-Service Portal, additionally as customer service automation (e.g. escalation rules, assignment rules). it's designed to permit you to support past, current, and future clients' requests for help with a product, service, and billing. you utilize this to help make people happy.

2. Sales Cloud Implements Sales and marketing whereas Service cloud implements Salesforce knowledge.

3. Sales Cloud ,A great solution for small and worth oriented mid-sized sales groups that need to quickly and cost effectively deploy Salesforce whereas Service Cloud   provides customer Support to the shoppers and giving you the tools to provide a better customer expertise for your clients.

 4. Sales Cloud provides you the flexibility to open Cases (issues) and relate them to Accounts, Contacts; etc. whereas The Service Cloud could be a superset of Sales Cloud, that means you get everything that's in Sales Cloud and some other features.

5. once we develop product in force.com for sales then it comes in Sales Cloud Ex: - Account, Contacts, and Lead. whereas when we need to provide some facility and additionally provides support to the clients then it comes in service Cloud. Ex: - produce cases is the example of Service Cloud in which client write his problem into cases instead of decision.


Functions in the Sales Cloud
If you’re presently using or are implementing salesforce.com’s Sales Cloud, you've got the foundation necessary to capture and resolve client questions or problems. the essential functionality includes:

Cases—you will track client inquiries, escalate problems requiring specialized support and monitor your agent’s productivity.

Solutions—Equip your client service team with the answers to your customer’s queries and even build the answers offered to the customers on the web so that they will find the answers themselves whenever they have them.

Web-to-Case—if your customers can’t notice what they’re looking for on the web, you can have them log a case directly from your web site that straightaway enters Salesforce.com for agent resolution.

Additional functionality within the Service Cloud

If you have a a lot of complicated support needs or a lot of active client service team, you ought to considerService Cloud licenses.  Service Cloud licenses provides the quality Sales Cloud practicality for your users, and add extra practicality to higher equip your team to supply service a lot of expeditiously. you'll have Sales Cloud and service Cloud users within the same instance of Salesforce.com. extra features of Service Cloud include:

Agent Console—This helps your agents access relevant info about the client with fewer clicks. you'll style the console to maximise this efficiency.

Entitlement Management—if you've got Service Level Agreements that give completely different levels of support for your customers, you'll use entitlement management to make sure that you just deliver the right service level as well as 1st response and resolution times. you'll additionally incorporate automatic processes that give directions for reps on the most effective way to resolve cases.

Access to measure Agent web Chat (additional fee on top of Service Cloud license)—Incorporate live chat from the web to make sure that your clients get answers from you in real time without a phone call

Thanks
Amit Chaudhary

Tuesday, 5 April 2016

Mass Delete | Delete from List View


Step 1:-  Create a Mass Delete button on account object 

Setup->Accounts->Buttons, Links, and Actions


Then Click on New Button or Link Button.


Then add below code in your button
{!REQUIRESCRIPT("/soap/ajax/9.0/connection.js")}

var records = {!GETRECORDIDS( $ObjectType.Account )};

if (records[0] == null) {
alert("Please select at least one record.")
}
else
{
var errors = [];
var result = sforce.connection.deleteIds(records);
if (result && result.length)
{
var numFailed = 0;
var numSucceeded = 0;
for (var i = 0; i < result.length; i++)
{
var res = result[i];
if (res && res.success == 'true')
{
numSucceeded++;
}
else
{
var es = res.getArray("errors");
if (es.length > 0)
{
errors.push(es[0].message);
}
numFailed++;
}
}
if (numFailed > 0)
{
alert("Failed: " + numFailed + "\nSucceeded: " + numSucceeded + " \n Due to: " + errors.join("\n"));
}
else
{
alert("Number of records deleted: " + numSucceeded);
}
}
window.location.reload();
}

Step 2:- Add button on List view

Setup -> Accounts->Account Search Layouts


Then add button in Account List view

Step 3:- Finally ready to use :-


Reference document which i followed :-
1) https://help.salesforce.com/HTViewHelpDoc?id=links_useful_custom_buttons_mass_delete.htm

You can install custom buttons from the Mass Delete app at http://sites.force.com/appexchange.
Thanks
Amit Chaudhary

Wednesday, 5 August 2015

How to check which Salesforce edition we are using | Which salesforce edition


What edition of Salesforce do you have?

Solution :- We can check the same from below two option

1) Browser :- Click on Tab then you can see the detail like below screen shot


2) By Company Setup :- Best Option is to check the same from company profile.
Setup- > Company profile 
like below screen shot. 


Thanks,
Amit Chaudhary

Saturday, 11 July 2015

Data Loading Tools


1) Jitterbit Data Loader for Salesforce   :- Fast, easy, no-coding integration for any SFDC Admin, Jitterbit Data Loader for Salesforce is a FREE data migration that enables Salesforce users to automate the import/export of data between flat files, databases, and Salesforce / force.com.

2) Dataloader.io   :- Dataloader.io is simple, free, no download required app for Salesforce. 100% cloud solution to quickly import, export and delete data in Salesforce.com.

3) Informatica Cloud Data Loader :- Informatica Cloud Data Loader for Salesforce is a FREE data loading application that automates the import/export of Salesforce and Force.com data between databases and files.

3) WebSphere Cast Iron Data Loader  :- WebSphere Cast Iron Data Loader is a FREE cloud based integration solution that allows Salesforce users to import/exchange data between Salesforce and other data sources like flat files (csv), dropbox.com, and other Salesforce organizations in minutes

Friday, 1 May 2015

SALESFORCE SUMMER ‘15 RELEASE NOTES


The Summer’15 release of Salesforce.com is now in available under pre-release program. In May Sandboxes will be upgraded so that your organization gets the look and feel of Summer’15 release

Customer/User’s Point of view


1) Data Loader for Mac

The Data Loader, an easy-to-use graphical tool that helps you import, export, update, and delete Salesforce data, is now available for Mac OS X.

To download the Mac version, from Setup, click Data Management > Data Loader


2) Choose the Logout Page for Salesforce Users

Direct users to a specific logout destination that maintains your own branding experience after they log out of Salesforce. Or, send them to a specific authentication provider’s page

From Setup, go to Security Controls > Session Settings. Set the Logout Page Settings to provide the URL of the custom logout page. If none is provided, the default is https://login.salesforce.com unless MyDomain is enabled. If My Domain is enabled, the default is https://customdomain.my.salesforce.com

3) Convert Leads to Contacts (Generally Available)

Sales representatives on the go can convert qualified leads to contacts, as well as create accounts and opportunities. This option is available in all versions of Salesforce1.

It’s easy to make this option available to your sales reps. From Setup in the full Salesforce site, click Customize > Leads > Settings, and then select the option to enable conversions on the Salesforce1
app.


4) Support Updating Picklist Fields Using Formulas

When your process updates fields, you can now use formulas and date functions as the value

5) Setup Assistant for Newly Activated Organizations

Setup Assistant helps you import data and customize your sales stages—all through easy-to-use wizards. And we’ve included helpful videos to get you and your teams on the way to increasing sales in Salesforce

6) Create or Edit Records Owned by Inactive Users

Previously, only administrators were able to edit accounts, opportunities, and custom object records that are owned by inactive users. With Spring ’15, administrators and all users with the create or edit permission can create or edit accounts, opportunities, and custom object records that are owned by inactive users. For example, you can edit the Account Name field on an opportunity record that is owned by an inactive user

7) Set Up Test Data for an Entire Test Class

Use test setup methods (methods that are annotated with @testSetup) to create test records once and then access them in every test method in the test class. Test setup methods can be time-saving when you need to create reference or prerequisite data for all test methods, or a common set of records that all test methods operate on.

Test setup methods are defined in a test class, take no arguments, and return no value. The following is the syntax of a test setup method.
@testSetup static void methodName() {

}

@isTest
private class CommonTestSetup {

    @testSetup static void setup() {
        // Create common test accounts
        List<Account> testAccts = new List<Account>();
        for(Integer i=0;i<2;i++) {
            testAccts.add(new Account(Name = 'TestAcct'+i));
        }
        insert testAccts;        
    }
    
    @isTest static void testMethod1() {
        // Get the first test account by using a SOQL query
        Account acct = [SELECT Id FROM Account WHERE Name='TestAcct0' LIMIT 1];
        acct.Phone = '555-1212';
        update acct;
       
       Account acct2 = [SELECT Id FROM Account WHERE Name='TestAcct1' LIMIT 1];
       delete acct2;
        
    }                                                                          }

8) Enforce IP Addresses in Login IP Ranges

The Enforce login IP ranges on every request Session Settings option restricts the IP addresses from which users can access Salesforce to only the IP addresses defined in Login IP Ranges. This option affects all user profiles that have login IP restrictions

  • From Setup, click Security Controls | Session Settings
  • Select Enforce login IP ranges on every request

9) Administrators Can Log in as Any User

Administrators with “Modify All Data” permission and delegated administrators with “View Setup and Configuration” permission can log in as any user without asking end users to grant access. Previously, this option was available only if Salesforce enabled the Administrators Can Log in as Any User setting for your organization. To disable this feature, contact Salesforce.


Relates Link :-

1) https://developer.salesforce.com/releases/release/Summer15
2) http://docs.releasenotes.salesforce.com/en-us/spring15/release-notes/salesforce_release_notes.htm


Thursday, 9 April 2015

Visualforce page life cycle in salesforce

When a user views a Visualforce page, instances of the controller, extensions, and components associated with the page are created by the server. The order in which these elements are executed can affect how the page is displayed to the user

There are two types of Visualforce page requests:


  1. A get request is an initial request for a page either made when a user enters an URL or when a link or button is clicked that takes the user to a new page.
  2. A postback request is made when user interaction requires a page update, such as when a user clicks on a Save button and triggers a save action.


Order of Execution for Visualforce Page Get Requests

A get request is an initial request for a page either made when a user enters an URL or when a link or button is clicked that takes the user to a new page. The following diagram shows how a Visualforce page interacts with a controller extension or a custom controller class during a get request:


In the diagram above the user initially requests a page, either by entering a URL or clicking a link or button. This initial page request is called the get request.

  1. Constructor methods on the associated controller / extension classes are called, instantiating the controller objects.
  2. If the page contains any custom components, they are created and the constructor methods on any associated custom controllers or controller extensions are executed. If attributes are set on the custom component using expressions, the expressions are evaluated after the constructors are evaluated.
  3. The page then executes any assignTo attributes on any custom components on the page. After the assignTo methods are executed, expressions are evaluated, the action attribute on the <apex:page> component is evaluated, and all other method calls, such as getting or setting a property value, are made.
  4. If the page contains an <apex:form> component, all of the information necessary to maintain the state of the database between page requests is saved as an encrypted view state. The view state is updated whenever the page is updated.
  5. The resulting HTML is sent to the browser. If there are any client-side technologies on the page, such as JavaScript, the browser executes them.

As the user interacts with the page, the page contacts the controller objects as required to execute action, getter, and setter methods.

Once a new get request is made by the user, the view state and controller objects are deleted

Note:-  If the user is redirected to a page that uses the same controller and the same or a proper subset of controller extensions, a postback request is made. When a postback request is made, the view state is maintained

Constructor of controller /extension - >  constructor of custom components  -> AssignTo any Custom Components -> Action method->Getter or Setter -> Form method -> HTML

Order of Execution for Visualforce Page Postback Requests

A postback request is made when user interaction requires a page update, such as when a user clicks on a Save button and triggers a save action. The following diagram shows how a Visualforce page interacts with a controller extension or a custom controller class during a postback request:


  1. During a postback request, the view state is decoded and used as the basis for updating the values on the page.
  2. After the view state is decoded, expressions are evaluated and set methods on the controller and any controller extensions, including set methods in controllers defined for custom components, are executed.
  3. The action that triggered the postback request is executed. If that action completes successfully, the data is updated. If the postback request returns the user to the same page, the view state is updated
  4. The resulting HTML is sent to the browser
If the postback request indicates a page redirect and the redirect is to a page that uses the same controller and a proper subset of controller extensions of the originating page, a postback request is executed for that page. Otherwise, a get request is executed for the page. If the postback request contains an <apex:form> component, only the ID query parameter on a postback request is returned

NOTE :- Once the user is redirected to another page, the view state and controller objects are deleted.


Thanks,
Amit Chaudhary

Sunday, 5 April 2015

Model View Controller (MVC) paradigm salesforce

Model view controller (MVC) is a software architecture pattern which separates the representation of information from the user’s interaction with it.

MVC pattern in salesforce contains below three modules:
  1. Model
  2. View
  3. Controller
1) A controller can send commands to its associated view to change the view’s presentation of the model . It can also send commands to the model to update the model’s state. According to Salesforce : How the interface actions. Controllers are used to perform the actions whenever users interact with visual force.

2) A model notifies its associated views and controllers when there has been a change in its state. This notification allows the views to produce updated output, and the controllers to change the available set of commands. A passive implementation of MVC omits these notifications, because the application does not require them or the software platform does not support them. According to salesforce :- What schema and data does salesforce uses to represent the system completely. In salesforce, we can say that sObjects are the model as every entity in salesforce is mapped to some sObject.

3) A view requests from the model the information that it needs to generate an output representation.
According to Saleforce :- How the schema and data is represented. Visualforce is used to present the data to users.


M - Model (Object, Fields, Relationships, Apex Classes)
V - View (Visualforce page, Pagelayouts, Record Types, Force.com Sites, Components)
C - Controller(Validation Rules, Controllers in a Visualforce page)

Some Useful link :- https://developer.salesforce.com/page/An_Introduction_to_Visualforce

Thanks,
Amit Chaudhary

Sunday, 15 March 2015

Type of Sandbox in salesforce


Developer Sandbox
Developer sandboxes are special configuration sandboxes intended for coding and testing by a single developer. Multiple users can log into a single Developer sandbox, but their primary purpose is to provide an environment in which changes under active development can be isolated until they’re ready to be shared. Just like Developer Pro sandboxes, Developer sandboxes copy all application and configuration information to the sandbox. Developer sandboxes are limited to 200 MB of test or sample data, which is enough for many development and testing tasks. You can refresh a Developer sandbox once per day.

REFRESH LIMIT    :-  Daily
DATA LIMIT          :-  200MB


Developer Pro Sandbox
The main difference between this and Developer is the amount of data that can be stored.  It also grabs some product data from production.  If those two things are important, use this one.  Otherwise, it's interchangeble with Developer

Developer Pro sandboxes copy all of your production organization's reports, dashboards, price books, products, apps, and customizations under Setup, but exclude all of your organization's standard and custom object records, documents, and attachments. Creating a Developer Pro sandbox can decrease the time it takes to create or refresh a sandbox from several hours to just a few minutes, but it can only include up to 1 GB of data. You can refresh a Developer Pro sandbox once per day

REFRESH LIMIT    :-  Daily
DATA LIMIT          :-  1GB


Partial Copy
Partial Data sandboxes include all of your organization’s metadata and add a selected amount of your production organization's data that you define using a sandbox template. A Partial Data sandbox is a Developer sandbox plus the data you define in a sandbox template. It includes the reports, dashboards, price books, products, apps, and customizations under Setup (including all of your metadata). Additionally, as defined by your sandbox template, Partial Data sandboxes can include your organization's standard and custom object records, documents, and attachments up to 5 GB of data and a maximum of 10,000 records per selected object. A Partial Data sandbox is smaller than a Full sandbox and has a shorter refresh interval. You can refresh a Partial Data sandbox every 5 days.

REFRESH LIMIT    :-  5 Days
DATA LIMIT          :-  5GB


Full Sandbox
Full sandboxes copy your entire production organization and all its data, including standard and custom object records, documents, and attachments. You can refresh a Full sandbox every 29 days.
Sandbox templates allow you to pick specific objects and data to copy to your sandbox, so you can control the size and content of each sandbox. Sandbox templates are only available for Partial Data or Full sandboxes.

REFRESH LIMIT    :-  29 Days
DATA LIMIT          :-  Same as Production


Sunday, 15 February 2015

Future Methods in Salesforce


A future method runs in the background, asynchronously. You can call a future method for executing long-running operations, such as callouts to external Web services or any operation you’d like to run in its own thread, on its own time. You can also make use of future methods to isolate DML operations on different sObject types to prevent the mixed DML error. Each future method is queued and executes when system resources become available. That way, the execution of your code doesn’t have to wait for the completion of a long-running operation. A benefit of using future methods is that some governor limits are higher, such as SOQL query limits and heap size limits

To define a future method, simply annotate it with the future annotation, as follows:-

global class FutureClass
{
    @future
    public static void myFutureMethod()
    {   
         // Perform some operations
    }
}

NOTE :-

1) Methods with the future annotation must be static methods
2) can only return a void type
3) The specified parameters must be primitive data types, arrays of primitive data types, or collections of primitive data types
4) Methods with the future annotation cannot take sObjects or objects as arguments.
5) You can invoke future methods the same way you invoke any other method. However, a future method can’t invoke another future method
6) No more than 50 method calls per Apex invocation
7) Asynchronous calls, such as @future or executeBatch, called in a startTest, stopTest block, do not count against your limits for the number of queued jobs
8) The maximum number of future method invocations per a 24-hour period is 250,000 or the number of user licenses in your organization multiplied by 200, whichever is greater
9) To test methods defined with the future annotation, call the class containing the method in a startTest(), stopTest() code block. All asynchronous calls made after the startTest method are collected by the system. When stopTest is executed, all asynchronous processes are run synchronously


IMP:-
The reason why sObjects can’t be passed as arguments to future methods is because the sObject might change between the time you call the method and the time it executes. In this case, the future method will get the old sObject values and might overwrite them.  To work with sObjects that already exist in the database, pass the sObject ID instead (or collection of IDs) and use the ID to perform a query for the most up-to-date record. The following example shows how to do so with a list of IDs


Example of a future method that makes a callout to an external service. Notice that the annotation takes an extra parameter (callout=true) to indicate that callouts are allowed

global class FutureMethodExample
{
    @future(callout=true)
    public static void getStockQuotes(String acctName)
    {   
         // Perform a callout to an external service
    }

}


Future Method Considerations

  • Remember that any method using the future annotation requires special consideration because the method does not necessarily execute in the same order it is called.
  • Methods with the future annotation cannot be used in Visualforce controllers in either getMethodName or setMethodName methods, nor in the constructor.
  • You cannot call a method annotated with future from a method that also has the future annotation. Nor can you call a trigger from an annotated method that calls another annotated method.
  • The getContent and getContentAsPDFPageReference methods cannot be used in methods with the future annotation

Thanks,
Amit Chaudhary

Monday, 19 January 2015

Triggers and Order of Execution Salesforce

When you save a record with an insert, update,delete or upsert statement. Salesforce perform the following event in below order

1.     Loads the original record from the database or initializes the record for an upsert statement.
2.     Loads the new record field values from the request and overwrites the old values.
If the request came from a standard UI edit page, Salesforce runs system validation to check the record for:

    •      Compliance with layout-specific rules
    •          Required values at the layout level and field-definition level
    •          Valid field formats
    •          Maximum field length

Salesforce doesn't perform system validation in this step when the request comes from other sources, such as an Apex application or a SOAP API call.
Salesforce runs user-defined validation rules if multiline items were created, such as quote line items and opportunity line items.
3.     Executes all before triggers.
4.     Runs most system validation steps again, such as verifying that all required fields have a non-null value, and runs any user-defined validation rules. The only system validation that Salesforce doesn't run a second time (when the request comes from a standard UI edit page) is the enforcement of layout-specific rules.
5.     Executes duplicate rules. If the duplicate rule identifies the record as a duplicate and uses the block action, the record is not saved and no further steps, such as after triggers and workflow rules, are taken.
6.     Saves the record to the database, but doesn't commit yet.
7.     Executes all after triggers.
8.     Executes assignment rules.
9.     Executes auto-response rules.
10.  Executes workflow rules.
11.  If there are workflow field updates, updates the record again.
12.  If workflow field updates introduced new duplicate field values, executes duplicate rules again.
13.  If the record was updated with workflow field updates, fires before update triggers and after update triggers one more time (and only one more time), in addition to standard validations. Custom validation rules are not run again.
14.  Executes processes.
Processes are currently available through a private beta program. For information on enabling this feature in your organization, contact Salesforce.
If there are workflow flow triggers, executes the flows.
Flow trigger workflow actions, formerly available in a pilot program, have been superseded by the Process Builder. Organizations that are using flow trigger workflow actions may continue to create and edit them, but flow trigger workflow actions aren’t available for new organizations. For information on enabling the Process Builder (beta) in your organization, contact Salesforce.
15.  Executes escalation rules.
16.  Executes entitlement rules.
17.  If the record contains a roll-up summary field or is part of a cross-object workflow, performs calculations and updates the roll-up summary field in the parent record. Parent record goes through save procedure.
18.  If the parent record is updated, and a grandparent record contains a roll-up summary field or is part of a cross-object workflow, performs calculations and updates the roll-up summary field in the grandparent record. Grandparent record goes through save procedure.
19.  Executes Criteria Based Sharing evaluation.
20.  Commits all DML operations to the database.
21.  Executes post-commit logic, such as sending email.

Friday, 2 January 2015

Salesforce.com Spring ’15 Release Notes :- Some Features I like

1) Indexed Column Added to Lists of Fields in Setup

Listings of fields in Setup include a new Indexed column that indicates when a field is indexed in the database
The new column is available for standard and custom objects and indicates indexing for standard and custom fields.

2) Get Faster and More Relevant Search Results (Generally Available)

In the Winter ’15 release, Salesforce Knowledge article search was updated with the new search infrastructure. In Spring ’15, we’re expanding this search infrastructure to all search utilities, including global search, sidebar search, and advanced search. This expanded enhancement was previously available only through a pilot program.
Faster indexing
Improved alphanumeric search

3) Import Accounts and Contacts with Ease

Available to new and trial organizations and coming soon to all other organizations, choose from sixteen popular data sources to quickly and easily get your accounts and contacts into Salesforce


4) Middle Name and Suffix Fields for Person Objects (Generally Available)

Better represent the name of a person associated with a record by adding Middle Name and Suffix fields in person objects. Using these fields also helps to avoid confusion when two records have the same first and last names

The Middle Name and Suffix fields are available for the following person objects: Contact, Lead, Person Account, and User. You need to do a few things before you can use them.

  1. Contact Salesforce Customer Support to enable the new fields.
  2. Click Setup | Customize | User Interface.
  3. In the Name Settings section, select Enable Middle Names for Person Names and Enable Name Suffixes for Person Names.
  4. Click Save.

5) More Streamlined Look for the Rich Text Editor

The Rich Text Editor, also known as the HTML Editor, that’s available in most rich text area fields has a new look, better performance, bug fixes, improved styling for pasted data, improved handling for pasted images, and increased compatibility with newer browsers. The updated editor is also available in rich text area custom fields on records and more


6)Administration Settings Moved from Setup to Community Management

Community Management is now a one-stop shop for setting up and managing your community. Setup consolidation makes it easier forcommunity administrators and managers to do their jobs from one location.

From Setup, click Customize | Communities | All Communities, then click Manage next to the community name

7) Prevent Spammers from Creating Cases

The reCAPTCHA widget requires guest users to complete a text field successfully before they can create a case. Setting up the widget on the Case Creation page elements protects your community from spam case submissions.

8) Open CTI

Open CTI helps partners integrate Salesforce with Computer-Telephony Integration (CTI) systems without installing adapter programs on call center users’ machines.
Several new and updated methods are available to help developers and advanced administrators customize SoftPhones for users. For more information, see Open CTI API.

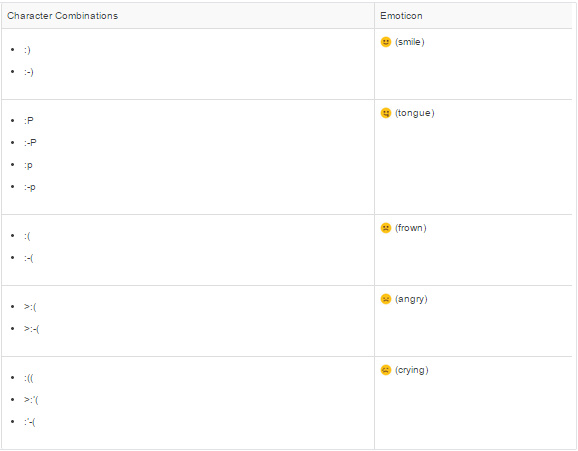
9) Emoticons Added in the Feed

Now your users can add expressions like a smiley face to their posts and comments by typing a character combination

We enabled emoticons by default. However, if you want to disable emoticons, navigate to Setup and click Customize |Chatter | Settings. In the Emoticons in Feed section, deselect Allow Emoticons.

10) Deploy Your Components in Less Time (Generally Available)


You can now deploy components to production by skipping the execution of all Apex tests for components that have been validated within the last four days. With Quick Deploy, you no longer have to wait for all tests to run for your deployment to complete in production, and your deployment will likely finish in less than 30 minutes.
As part of a deployment, all Apex tests are run in production. If the production organization contains many Apex tests, the execution of all tests can be time-consuming and can delay your deployment. To reduce deployment time to production, you can perform a quick deployment by skipping the execution of all tests. Quick deployments are available for change sets and Metadata API components when the following requirements are met.
  • The components have been validated successfully for the target environment within the last four days (96 hours).
  • As part of the validation, all Apex tests in the target organization have passed.
  • The overall code coverage in the organization is at least 75%, and Apex triggers have some coverage.

11) Create or Edit Records Owned by Inactive Users

Previously, only administrators were able to edit accounts, opportunities, and custom object records that are owned by inactive users. With Spring ’15, administrators and all users with the create or edit permission can create or edit accounts, opportunities, and custom object records that are owned by inactive users. For example, you can create an account and assign an inactive user as the record owner. Or you can edit the Account Name field on an opportunity record that is owned by an inactive user to change its parent account.


12)Availability of Compound Fields in Formula Functions Changed

You could previously use compound fields in all formula expressions, but unhandled exceptions would often result. Compound fields have been enabled in the ISNULL, ISBLANK, and ISCHANGED functions and have been blocked in several other functions so that you won’t encounter these errors.
The following have been blocked from using compound fields.
  • BLANKVALUE
  • CASE
  • NULLVALUE
  • PRIORVALUE
  • The comparison and equality operators: = and == (equal), <> and != (not equal), < (less than), > (greater than), <= (less than or equal), >= (greater than or equal), && (AND), and || (OR)

13)Standard Address Fields Show Google Maps


Records with standard address fields now display a Google Maps image of the address. This saves users time by letting them see where their contacts or accounts are located, instead of having to locate addresses in a separate browser tab.
On a record, go to the detail page to see the Google Maps image on the address field. To generate a map image, an address must include the street and city fields and either the state, postal code, or the country. If an address field is missing any of the required information, a map won’t display

The map image on the address is static, but clicking the map image opens Google Maps in a new browser tab.
Maps on standard address fields are enabled by default. To disable maps for your organization, from Setup in the fullSalesforce site, click Customize | Maps and Locations | Settings and uncheck Enable Maps and Location Services.

Please check below link for more update :-

Thanks,
Amit Chaudhary