Wednesday, 15 November 2017

Salesforce Deployment Using ANT Migration Tool | ANT Deployment Tool

Please follow below step to configure Migration Tool ANT

Step 1) Install the Java

Please use 1.7x or later version for better security and for TLS security.

Migration using ANT in Salesforce


Step 2) Download the ANT


        1) Download ANT from below URL :- https://ant.apache.org/bindownload.cgi


        2) Download the zip file of Force.com Migration Tool from https://developer.salesforce.com/docs/atlas.en-us.daas.meta/daas/forcemigrationtool_install.htm

       or you can click on STEP -> Tool -> Force.com Tools and Toolkits

salesforce ant migration jar

     Then Click on Force.com Migration Tool: and download the JAR file.

     Now We have below two zip files.

salesforce ant migration jar

     Unzip both the files.

       3) Now Open Force.com Migration Folder (salesforce_ant_41.0 in my case). and copy "ant-salesforce.zip" File and paste in apache-ant-1.10.1\lib folder "D:\ANTTool\apache-ant-1.10.1-bin\apache-ant-1.10.1\lib" .


Step 3) Set the path.


Now we need to set ANT_HOME and JAVA_HOME variable which we can set from Environment variable.

ANT_HOME   :- Set the address where you installed the ANT.
JAVA_HOME  :- set the value where your JDK is located.
Path  :- Set And and Jave path till bin folder


Now All Set. Check the version


Step 4) Configure "Build.xml" and "build.properties" Files


To setup connection with salesforce we need to configure the "build.properties".
  • Go to folder where you unzip the Force.com  Migration Tool Files. (in my case salesforce_ant_41.0 )
  • Open the "build.properties" and update like below 
  1. # build.properties
    #

    # Specify the login credentials for the desired Salesforce organization
    sf.username = amit.salesforce21@gmail.com.demoapp
    sf.password = Password

    sf.myDevusername = amit.salesforce21@gmail.com.kt
    sf.myDevpassword = Password

    #sf.sessionId = <Insert your Salesforce session id here.  Use this or username/password above.  Cannot use both>
    #sf.pkgName = <Insert comma separated package names to be retrieved>
    #sf.zipFile = <Insert path of the zipfile to be retrieved>
    #sf.metadataType = <Insert metadata type name for which listMetadata or bulkRetrieve operations are to be performed>

    # Use 'https://login.salesforce.com' for production or developer edition (the default if not specified).
    # Use 'https://test.salesforce.com for sandbox.
    sf.serverurl = https://login.salesforce.com

    sf.maxPoll = 20
    # If your network requires an HTTP proxy, see http://ant.apache.org/manual/proxy.html for configuration.
    #


  • Now configure "build.xml" to retrievePkg and Deploy.

<project name="Sample usage of Salesforce Ant tasks" default="test" basedir="." xmlns:sf="antlib:com.salesforce">

    <property file="build.properties"/>
    <property environment="env"/>

    <!-- Setting default value for username, password and session id properties to empty string
         so unset values are treated as empty. Without this, ant expressions such as ${sf.username}
         will be treated literally.
    -->
    <condition property="sf.username" value=""> <not> <isset property="sf.username"/> </not> </condition>
    <condition property="sf.password" value=""> <not> <isset property="sf.password"/> </not> </condition>
    <condition property="sf.sessionId" value=""> <not> <isset property="sf.sessionId"/> </not> </condition>

    <taskdef resource="com/salesforce/antlib.xml" uri="antlib:com.salesforce">
        <classpath>
            <pathelement location="../ant-salesforce.jar" />           
        </classpath>
    </taskdef>
   
    <!-- Shows deploying code & running tests for code in directory -->
    <target name="deployCode">
      <!-- Upload the contents of the "codepkg" directory, running the tests for just 1 class -->
      <sf:deploy username="${sf.myDevusername}" password="${sf.myDevpassword}" sessionId="${sf.sessionId}" serverurl="${sf.serverurl}" maxPoll="${sf.maxPoll}" deployRoot="codepkg">
       </sf:deploy>
    </target>
   
    <!-- Shows retrieving code; only succeeds if done after deployCode -->
    <target name="retrieveCode">
      <!-- Retrieve the contents listed in the file codepkg/package.xml into the codepkg directory -->
      <sf:retrieve username="${sf.username}" password="${sf.password}" sessionId="${sf.sessionId}" serverurl="${sf.serverurl}" maxPoll="${sf.maxPoll}" retrieveTarget="codepkg" unpackaged="codepkg/package.xml"/>
    </target>

</project>


  • Now Setup your Package.xml file
<?xml version="1.0" encoding="UTF-8"?>
<Package xmlns="http://soap.sforce.com/2006/04/metadata">
    <types>
        <members>*</members>
        <name>ApexClass</name>
    </types>
    <types>
        <members>*</members>
        <name>ApexTrigger</name>
    </types>
    <version>41.0</version>
</Package>


Step 5) Now execute the command


 retrieve the Code from Source Salesforce org and execute below command

ant retrieveCode


Now Deploy the code to target Salesforce org

ant deployeCode


Reference :-
https://developer.salesforce.com/docs/atlas.en-us.daas.meta/daas/meta_development.htm

Thanks,
Amit Chaudhary

Sunday, 29 October 2017

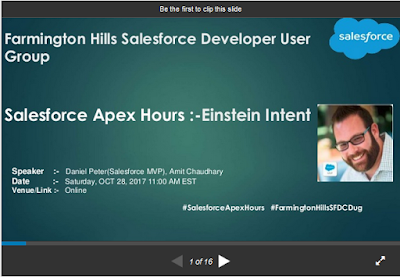
Salesforce Apex Hours: Einstein Intent


Farmington Hill Salesforce Developer group / "Salesforce Apex Hours" organized another successful Online session/event on Saturday, OCT 28, 2017 , focusing on "Salesforce Apex Hours: Einstein Intent".

"Salesforce Apex Hours" is a recurring event to talk about salesforce ! Some times we'd like to meet on one location and some time online. This time we are planning one online session on "Einstein Intent " job with Daniel Peter (Salesforce MVP).  

Agenda :- 
 • Introduction to Einstein Intent
• Demo
• FAQ

Speaker : -Daniel Peter (Salesforce MVP) , Amit Chaudhary
Date :- Saturday, OCT 28, 2017 11:00 AM EST
Venue/Link :- https://www.meetup.com/Farmington-Hills-Salesforce-Developer-Meetup/events/244157201/


Here is PPT of Session

https://www.slideshare.net/AmitChaudhary112/salesforce-apex-hours-einstein-intent/1


Here is Session Recording


Thanks
Amit Chaudhary @amit_sfdc
Email :- amit.salesforce21@gmail.com


Sunday, 1 October 2017

Salesforce Apex Hours: What means Winter 18 for Developers


Farmington Hill Salesforce Developer group / "Salesforce Apex Hours" organized another successful Online session/event on Saturday, SEPT 30, 2017 , focusing on "Winter 18".


This time we planned one online session on "Winter 18 for Developer" with Jitendra Zaa (Salesforce MVP).

Agenda :-
  • What’s new in Winter 18 for Developer
  • Enhancements in Flow
  • Other platform improvements


Speaker : -Jitendra Zaa (Salesforce MVP),Amit Chaudhary
Date :- Saturday, Sept 30, 2017 11:00 AM EST
Venue/Link :- https://www.meetup.com/Farmington-Hills-Salesforce-Developer-Meetup/events/243446732/


Here is PPT of Session


https://www.slideshare.net/secret/mMLe4R3pVZGNd2


Here is Session Recording


Thanks
Amit Chaudhary @amit_sfdc
Email :- amit.salesforce21@gmail.com


Wednesday, 6 September 2017

Salesforce to Salesforce | S2S | How to Setup Salesforce to Salesforce


STEP 1) Enabling Salesforce to Salesforce

Enable the Salesforce to Salesforce in both the org. Follow below step to do that
Setup--> Salesforce to Salesforce --> Salesforce to Salesforce Setting.


 Then click on Edit button checked the Enable checkbox.


NOTE:- you should have "Manage Connections" access on profile level.

Step 2) Connection Setup

To setup connection you need to open "Connection" Tab. Then Click on New Tab.

Then Select Account and Contact then click on "Save & Send Invite". You also need to set Owner. Owner will get notification if any error will come.


When you will click on "Save & Send Invite" button Contact (Amit Chaudhary) will get a email like below

Then copy above URL and login by other org user.


Then other org user need to accept the invitation.

Now Connection is established but no object is shared.

Step 3) Publishing Objects

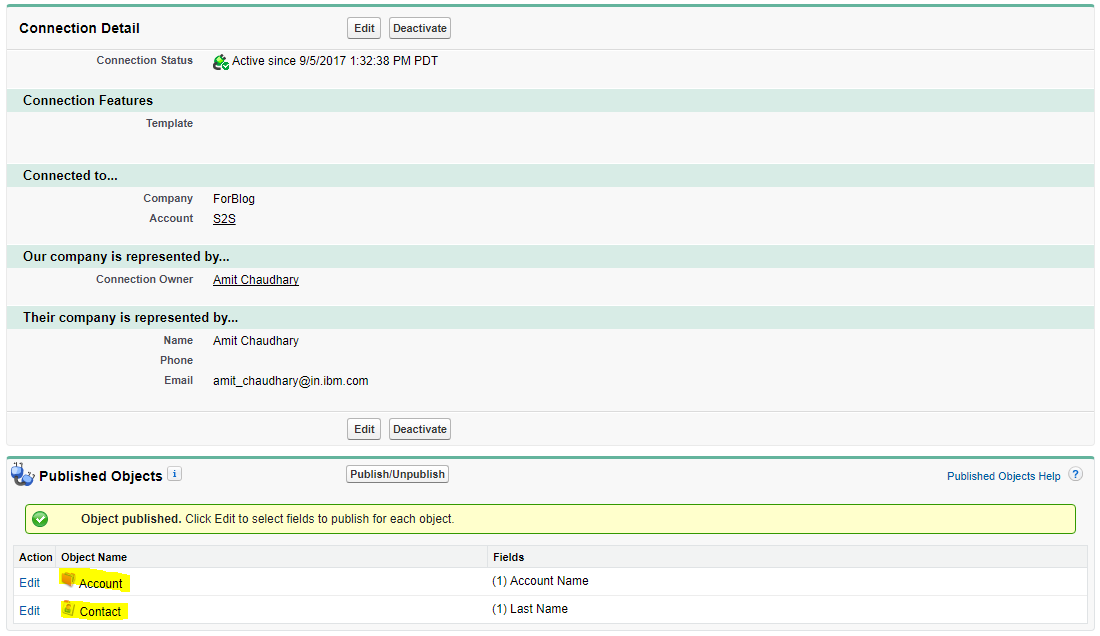
Now we need to publish or subscribe the standard or custom object. To publish the object you need to go to first Org and click on "Publish/Unpublish" button.

Then select the object and click on save.


You can select the field from Publish Object related list. Select the object and click on Object name.


Step 4) Subscribing Objects

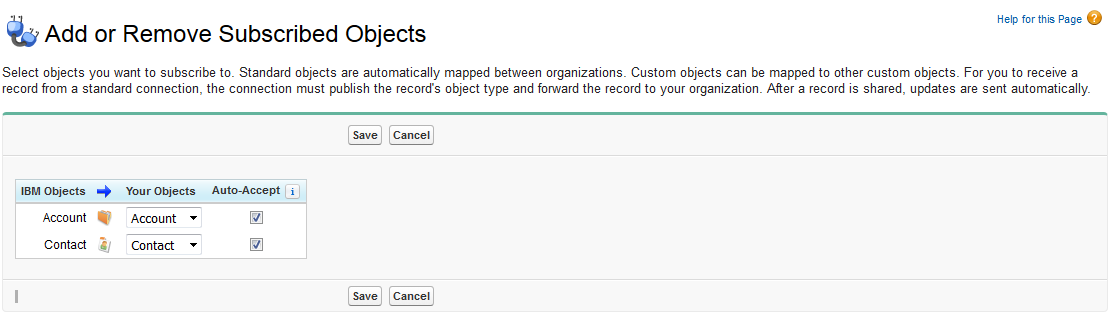
Now got back to receiving org and click on "Subscribed Objects" related list.


 Then map the object.


Now we need to map the field. Go to "Subscribed Object" related list and select object and map field.


Now connection is setup.


Step 5) Using the Shared Connection

To share the record we have two way one is Manual and 2nd is by programming. 
  •     Manual Sharing Records
 To share record manually click go to object List View and click on "Forward To Connection"


Then select the connection and click on Save button.

Records will be automatically created in the target environment if auto-accept for the object is enabled

  •  Programmatic sharing records via Apex
    Some time we need to send record to other org automatically. Then we can create some trigger like below and do the same.

Sample Code.
trigger ShareAccountS2S on Account (After update) {
    Set <Id> setAcc = new Set<Id>();
    for(account acc : Trigger.New){
        if(acc.Active__c == 'Yes'){
            setAcc.add(acc.id);
        }
    }
 
    if(setAcc.size() >0) {
        Id NetworkId ;
        String connName ='ForBlog'; // Plz add connection Name 
        list<PartnerNetworkConnection> conns = [select id from PartnerNetworkConnection where ConnectionName = :connName ];
        if(conns.size()>0) {
            NetworkId = conns[0].id;
        }

        if( NetworkId != NULL ){
            string relatedRecords = 'Contact' ;
            list<PartnerNetworkRecordConnection> recordShares = new list<PartnerNetworkRecordConnection>();
            for(id accId : setAcc )
            {
                recordShares.add(new PartnerNetworkRecordConnection(
                    ConnectionId = networkId,
                    LocalRecordId = accId,
                    RelatedRecords = relatedRecords
                ));
            }
            insert recordShares;  
        }    
    }
}

Related Post
1) Salesforce to Salesforce Overview
2) https://developer.salesforce.com/page/Best_Practices_for_Salesforce_to_Salesforce

Thanks
Amit Chaudhary
@amit_sfdc

Monday, 14 August 2017

Language Translation in VisualForce Page | Translation Workbench


Salesforce offer functionality through that we'll be able to create single VF page which can be translated in several languages based on language/locale preference of current logged in user. We just need to upload the translation of all custom fields that you're going to use in VF page . To render the VF page in particular language, use Language attribute on <apex:page> tag.

Please follow below step to achieve the same. 
Step 1) Enable Translation Workbench and all Translation   Please follow below post to enable Translation Workbench
URL :-Translation Workbench - Salesforce ( Multilingual picklist values )

Step 2) You Can use the "Language" attribute of the VF page.

Step 3) Try to use Salesforce standard way to is to use apex:inputField tag with assigned sobject field. In this case a field will be generated automatically with respect to the current user language. 
Apex Class:-

public with sharing class TranslationWorkbenchController {
    public string selectedLang{get;set;}
    public List<selectoption> listOfLang {get;set;}
    public TranslationWorkbenchController(ApexPages.StandardController controller) {
        selectedLang='en';

        listOfLang = new List<selectOption>();
        listOfLang.add(new selectOption('en','English'));
        listOfLang.add(new selectOption('it','Italian'));
        listOfLang.add(new selectOption('es','Spanish'));
        listOfLang.add(new selectOption('de','German'));
        listOfLang.add(new selectOption('fr','French'));
    }
}


VF Page :-


<apex:page standardcontroller="Account" extensions="TranslationWorkbenchController" language="{!selectedLang}" >
<apex:form >

        <apex:selectList value="{!selectedLang}" size="1">
            <apex:selectoptions value="{!listOfLang}"/>
            <apex:actionsupport event="onchange"/>
        </apex:selectlist>
   
        <apex:pageblock >
            <apex:pageblocksection >
                <apex:inputfield value="{!Account.Name}"/>
                <apex:inputfield value="{!Account.Type}"/>
                <apex:inputfield value="{!Account.Industry}"/>
                <apex:inputfield value="{!Account.BillingCountry}"/>
            </apex:pageblocksection>
        </apex:pageblock>
   
</apex:form>
</apex:page>


Screen shot :-

English :-


Spanish:-


Thanks
Amit Chaudhary

Sunday, 6 August 2017

Webservice callout from Scheduled Apex | Report in Batch Job | System.CalloutException: Callout from scheduled Apex not supported


We used to get "System.CalloutException: Callout from scheduled Apex not supported" Error when we are making a webservice callout from a class which is implementing Database.Schedulable interface because Salesforce does not allow us to make callouts from Schedulable classes.

Issue

Sample Scheduler Class


global class SampleScheduler implements Schedulable{
    
    global void execute(SchedulableContext sc) 
    {        
        Http http = new Http();
        HttpRequest request = new HttpRequest();
        request.setEndpoint('https://th-apex-http-callout.herokuapp.com/animals');
        request.setMethod('GET');
        HttpResponse response = http.send(request);

        if (response.getStatusCode() == 200) {
            Map<String, Object> results = (Map<String, Object>) JSON.deserializeUntyped(response.getBody());
            List<Object> animals = (List<Object>) results.get('animals');
            System.debug('Received the following animals:');
            for (Object animal: animals) {
                System.debug(animal);
            }
        }
    }    
}

Execute Above Scheduler Class


String sch = '0 00 * * * ?';
system.schedule('Test Schedule', sch, new SampleScheduler());


Error Screen Shot 

Scheduler: failed to execute scheduled job: jobId: 7076A00000EmLPu, class: common.apex.async.AsyncApexJobObject, reason: Callout from scheduled Apex not supported


Solution :- We can solved this issue with below solution.
  1. @future method
Scheduler Class

global class SampleScheduler implements Schedulable{
    
    global void execute(SchedulableContext sc) 
    {        
 
  BatchUtilClass.futureMethodSample();
    }    
}

Future Class Method

public class BatchUtilClass {
    @future(callout=true)
    public static void futureMethodSample() {
        Http http = new Http();
        HttpRequest request = new HttpRequest();
        request.setEndpoint('https://th-apex-http-callout.herokuapp.com/animals');
        request.setMethod('GET');
        HttpResponse response = http.send(request);

        if (response.getStatusCode() == 200) {
            Map<String, Object> results = (Map<String, Object>) JSON.deserializeUntyped(response.getBody());
            List<Object> animals = (List<Object>) results.get('animals');
            System.debug('Received the following animals:');
            for (Object animal: animals) {
                System.debug(animal);
            }
        }
    }
}


Thanks
Amit Chaudhary

Tuesday, 25 July 2017

Success Story of :- Gaurav Kheterpal

Welcome to my 11th Salesforce Success Story series. This series is focused on success story and to inspire/encourage new user/Developer. And why we should join our local Salesforce Developer/User group.


1) Your Job Title

Vice President - Mobility & Technology Evangelism at Metacube 

2) Your success Story

I'm a BITS Pilani alumni and I've been in the industry for about 17 years. I used to work on telecom applications and protocol stacks before I accidentally stared my Salesforce journey in 2007. I was initially involved in building mobile applications on the Force.com platform which helped me gain a holistic understanding of Salesforce over the years. I'm a naturally inquisitive person so I tend to dig deeper into how things work and this helped me learn Salesforce. In 2012, my team built an app called ‘Noteprise’ – a connector  between Salesforce and Evernote, basically notes for enterprise powered by the Force.com platform. The app was a runner-up in a global mobile development challenge held by Salesforce and was selected for the mobile dev gallery – a collection of some of the best reference applications. I was then developed a few more interesting applications like one called Socialforce, which is a mashup of Salesforce, Facebook, Twitter and Linkedin & again won an award from Salesforce. I keep experimenting, and in 2014, I wrote another app using the Titanium framework for Force.com which won the Appcelerator enterprise app challenge

Although I started off in 2007, I believe 2012 was the definitive year for me - my app won an award from Salesforce, I presented at Dreamforce for the first time and since then I've not looked back. I've presented sessions at Dreamforce every year since then and I'm eagerly looking forward to the results of Call for papers for Dreamforce 2017 that's due soon.

I'm the co-leader for the Jaipur Developer User Group and we try to do events with high-quality content on a regular basis. I feel honoured that Salesforce recognised me as a developer success story on their blog in year 2015. I was inducted as a Salesforce MVP last year and I believe it's an important milestone in my journey.


3) Why we Should Join a Salesforce User/Developer Group 
There's no better way to learn than learning in a group. Jaipur Developer User Group is a great example of collaborative learning. You get to learn from the others as well as share your knowledge among others. It helps you connect to people and also opens up opportunities to grow your network.
4) Advice for new Salesforce Developer 
Spend time focusing on the concepts. Trailhead is a great starting point. Once you feel confident, appear for the relevant certification to you. Give yourself time - don't look for shortcuts. Salesforce isn't a magic wand for your career but if you work hard, it can help you create the magic.
5) Trailhead badges
I'm at about 90 badges right now and I'm eager to find time to join the elusive Ranger club of 100+ badges. When Trailhead started off, I was among the leaders for the first few weeks but then I just couldn't devote enough time as expected. Hopefully, I'll cross that bridge some day.


Follow Gaurav Kheterpal on:
 Twitter or his blog blog


If you want to share your Salesforce Success Story, Please feel free to drop me an email :- amit.salesforce21@gmail.com 


<<PREVIOUS       NEXT>>


Thanks
Amit Chaudhary
@amit_sfdc