Showing posts with label Configuration. Show all posts

Monday, 7 January 2019

How to setup salesforce customer community | Setup and manage salesforce communities

How to setup salesforce customer community


Long time back we create one post of "How to setup salesforce community". In this post we will talk about step by step process to setup salesforce community. We will cover below topics:-

1) Introduction to Community Cloud.

2) How to create Basic Salesforce Community with Community Builder.
3) How to create the Custom Content Layout with Lightning Component.
4) How to setup Salesforce Navigation Menu.
5) How to setup page Variations and audience in Lightning Salesforce Community.
6) How to setup/configure Snap-in Chat.
7) How to create Lightning Bolt Solution.


1) Introduction to Community Cloud

Get to know about what is community cloud and how many type of community cloud license we have.


2) Setup Salesforce Community 

In this recording we talk about how to setup Salesforce lightning community and how to configure the community Theme, change color / font and Upload the community header/ banner image. We also talk about how to setup self registration in community.


3) Content Layout in Salesforce Community

In this recording we talk about how to create custom content layout for your Salesforce community.


4) Setup Communities Navigation Menu

In this recording we talk about how to create navigation menu/sub menu for your Salesforce community.

5) Page Variations and Audience in Salesforce Community

Audiences are sets of criteria used to define community member. Use them to keep your community members engaged by offering them personalized, relevant content. We can also create page variations that target specific audiences community (base on location, profile etc), and control who sees which page base on their profile and audiences criteria. Please check below recording for step by step process to setup page variations and audience in salesforce community.


6) Knowledge In Community

In this recording we can see how to configure the Knowledge and how to configure the Content / Articles for your Salesforce community.


7) Snap in Chat in Salesforce Community 

If you want to configure the Live agent with Snap-in Chat then check below recording. In below recording we talk about step by step process to configure the Snap-in Chat.


8) Lightning Bolt Solution

In out last post we talk about Lightning Bolt Solution.
Lightning Bolt - new framework for deploying next generation communities and portals quicker. Lightning Bolt for Salesforce allows you to quickly build and distribute industry-specific Lightning Bolt Solutions to jump-start new org capabilities. Save time by building once then reusing

If you want to create the Lightning Bolt Solution. Please check below recording.


Please share your feedback and let us know if you want to learn some new topic in Salesforce Community.


Thanks,
Amit Chaudhary
amit.salesforce21@gmail.com

Thursday, 8 September 2016

Setup Muliple Account for Contact | Associate a Contact with Multiple Accounts


Contacts to Multiple Accounts lets your sales reps simply manage the relationships between folks and businesses while not making duplicate records
Enable Contacts to Multiple Accounts, modify page layouts, and customise your connected lists thus your sales reps will simply track relationships between individuals and also the businesses they work with

NOTE:- If you disable Contacts to Multiple Accounts, confine mind that doing thus deletes all indirect account-contact relationships. Associations between a contact and its primary account stay.
 

Setup Muliple Account for Contact 

1) Click on Setup, enter Account Settings in Quick Find, then choose Account Settings.


2) choose permit ""

3) Add Contacts related list to the account page layouts that your reps use.

(Above image is used from trailhead module)

4) Add the Related Accounts list to the contact page layouts your reps use.


How to use

Step 1:- Click on Account object and go to "Related Contacts" Related list.


Step 2:- Click on Add Relationship button


Step 3:- Save.


For more detail please check below post :-
1) https://releasenotes.docs.salesforce.com/en-us/summer16/release-notes/rn_sales_shared_contacts.htm

2) https://trailhead.salesforce.com/admin_intro_accounts_contacts/admin_intro_accounts_contacts_relationships

Thanks
Amit Chaudhary

Tuesday, 5 April 2016

Mass Delete | Delete from List View


Step 1:-  Create a Mass Delete button on account object 

Setup->Accounts->Buttons, Links, and Actions


Then Click on New Button or Link Button.


Then add below code in your button
{!REQUIRESCRIPT("/soap/ajax/9.0/connection.js")}

var records = {!GETRECORDIDS( $ObjectType.Account )};

if (records[0] == null) {
alert("Please select at least one record.")
}
else
{
var errors = [];
var result = sforce.connection.deleteIds(records);
if (result && result.length)
{
var numFailed = 0;
var numSucceeded = 0;
for (var i = 0; i < result.length; i++)
{
var res = result[i];
if (res && res.success == 'true')
{
numSucceeded++;
}
else
{
var es = res.getArray("errors");
if (es.length > 0)
{
errors.push(es[0].message);
}
numFailed++;
}
}
if (numFailed > 0)
{
alert("Failed: " + numFailed + "\nSucceeded: " + numSucceeded + " \n Due to: " + errors.join("\n"));
}
else
{
alert("Number of records deleted: " + numSucceeded);
}
}
window.location.reload();
}

Step 2:- Add button on List view

Setup -> Accounts->Account Search Layouts


Then add button in Account List view

Step 3:- Finally ready to use :-


Reference document which i followed :-
1) https://help.salesforce.com/HTViewHelpDoc?id=links_useful_custom_buttons_mass_delete.htm

You can install custom buttons from the Mass Delete app at http://sites.force.com/appexchange.
Thanks
Amit Chaudhary

Friday, 5 February 2016

Types of Sharing in Salesforce


1. Force.com Managed Sharing
Force.com managed sharing involves sharing access granted by Force.com based on record ownership, the role hierarchy, and sharing rules:

  • 1.1 Record Ownership :- Each record is owned by a user or optionally a queue for custom objects, cases and leads. The record owner is automatically granted Full Access, allowing them to view, edit, transfer, share, and delete the record.
  • 1.2 Role Hierarchy :- The role hierarchy enables users above another user in the hierarchy to have the same level of access to records owned by or shared with users below. Consequently, users above a record owner in the role hierarchy are also implicitly granted Full Access to the record, though this behavior can be disabled for specific custom objects. The role hierarchy is not maintained with sharing records. Instead, role hierarchy access is derived at runtime. For more information, see “Controlling Access Using Hierarchies” in the Salesforce online help.
  • 1.3 Sharing Rules :-Sharing rules are used by administrators to automatically grant users within a given group or role access to records owned by a specific group of users. Sharing rules cannot be added to a package and cannot be used to support sharing logic for apps installed from Force.com AppExchange. Sharing rules can be based on record ownership or other criteria. You can't use Apex to create criteria-based sharing rules. Also, criteria-based sharing cannot be tested using Apex. All implicit sharing added by Force.com managed sharing cannot be altered directly using the Salesforce user interface, SOAP API, or Apex.


2. User Managed Sharing, also known as Manual Sharing
User managed sharing allows the record owner or any user with Full Access to a record to share the record with a user or group of users. This is generally done by an end-user, for a single record. Only the record owner and users above the owner in the role hierarchy are granted Full Access to the record. It is not possible to grant other users Full Access. Users with the “Modify All” object-level permission for the given object or the “Modify All Data” permission can also manually share a record. User managed sharing is removed when the record owner changes or when the access granted in the sharing does not grant additional access beyond the object's organization-wide sharing default access level.

3. Apex Managed Sharing
Apex managed sharing provides developers with the ability to support an application’s particular sharing requirements programmatically through Apex or the SOAP API. This type of sharing is similar to Force.com managed sharing. Only users with “Modify All Data” permission can add or change Apex managed sharing on a record. Apex managed sharing is maintained across record owner changes.
https://developer.salesforce.com/page/Using_Apex_Managed_Sharing_to_Create_Custom_Record_Sharing_Logic 

trigger Hiring_Manager_Job_Share on Job__c (after insert) {
    if(trigger.isInsert)
 {
  List<Job__Share> jobShares  = new List<Job__Share>();

  for(Job__c job : trigger.new)
  {
   Job__Share hiringManagerShare = new Job__Share();
   hiringManagerShare.ParentId = job.Id;
   hiringManagerShare.UserOrGroupId = job.Hiring_Manager__c;
   hiringManagerShare.AccessLevel = 'edit';
   hiringManagerShare.RowCause = Schema.Job__Share.RowCause.Hiring_Manager_Access__c;
   jobShares.add(hiringManagerShare);
  }
    Database.SaveResult[] jobShareInsertResult = Database.insert(jobShares,false);
    }
}


Thursday, 1 January 2015

Translation Workbench - Salesforce ( Multilingual picklist values )

Translation Workbench | Salesforce  

ü  Enable the translation workbench with the languages you require.
ü  Create Translations for objects and fields

Enable the translation work bench
NavigationSetup  > Translation workbench > Translation settings


Note: In a Developer organization with a managed package containing translations, once the Translation Workbench is enabled, it can't be disabled.
Note: The “Manage Translation” permission is enabled by default in the System Administrator profile.
To disable the Translation Workbench, from Setup, Translation Workbench -> Translation Settings -> Disable

Adding Translated Languages and Translators

To add or edit translated languages and translators:

      1. From Setup, click Translation Workbench -> Translation Settings.
      2. Click Add to activate a new language or Edit to change an existing supported language.
      3. If adding a new language, choose a language.
      4. To make the entered translations available to your users - select Active. Users can change their           personal language anytime whether or not it's active in the Translation Workbench. Selecting              Active makes the translations available to the users in that language.
        Tip: We recommend you don't make a language active until the translators have translated all values.
      5. To assign translators for this language, select them from the Available List and click Add. If               you don’t    see the member you want to add, enter keywords in the search box and click Find.
      6. Click Save


Entering Translations and Overrides
  1. Click Translation Workbench -> Translate to translate customizations made to your Salesforce organization or Translation Workbench -> Override to override translations from managed packages.
  2. If you are overriding translations in managed packages, select the Package you are overriding.
  3. Select the Language you're translating into.
  4. Select a Setup Component. Click the pull-down menu to select from the list of translatable       customizations. See Translatable Customizations for a complete list of possible customizations.
  5. If necessary select an object and aspect. For example, workflow tasks have an object (Account, Contact, etc.) and aspect (Subject or Comment).
  6. Double click in the translation column to enter new values. You can press TAB to advance to the next editable field or SHIFT-TAB to go to the previous editable field.
  7. Click Save


How to see the Translation

  NavigationMy settings > Personal > Language & Time Zone
  Change the language in the below screen and verify the localized text which is entered


Best Practices for the Translation Workbench

To make the Translation Workbench most effective, administrators should:
  • Let translators know which languages they are responsible for translating.
  • Notify all translators when new translated components are added to your organization.
  • Advise users when customizing reports or list views to use filter criteria values in their personal language.

However, if they use the Starts With or Contains operators, advise them to choose the language of
the filter criteria values they entered.

Localize and Customize Labels and Messages of Visual Force Pages

The following steps are required for localize the labels
  1. Enable the translation workbench with the languages you require.
  2. Create labels for all the localizable text on the page.
  3. Replace the page text with the labels.
  4. Add a translation for each label.
  5. Change your profile language to test

Translate and Customize Labels

Navigation: Setup > Create > Custom Labels

Click on new custom label


Accessing custom label in the visual force page

<apex:page controller="TranslationWorkbenchDemoController">
  <h1>{!$Label.Welcome}</h1>
</apex:page>

Accessing Custom label in the apex classes

  ApexPages.addmessage(new ApexPages.message(ApexPages.severity.INFO, Label.Welcome ));


Thanks,
Amit Chaudhary 

Saturday, 20 December 2014

How to Disable Reset My Security Token Option in Salesforce


Step 1 : My Settings -> Personal


Here you can see Reset My Security Token option

Step 2 :  Setup -> Manage Users -> Profiles -> Login Ip Ranges


Step 3 : Enter the Start IP, End IP Address and save it

Then Check it whether the Reset Security option is disable or not.


Thanks,
Amit Chaudhary 

Monday, 8 December 2014

Custom login page for Salesforce community


Requirement 
:-

Some time we need to override salesforce standard login page with client login page in salesforce community. 

Solution :

Prerequisite :-  

1) Community should be Setup (for the you can refer my below blog ):-
2) Create A Visual force according to your company requirement
3) Create a controller for VF page. We need to use below code to login in Salesforce.


1.    global PageReference CustomLogin()   
2.    {  
3.      return Site.login(username, password, null);   
4.    }  


  1. Once you create new community then click on Customize -> Communities -> All Communities, then from click on Force.com.
  2. Then go to "Site Visualforce Pages". And select you page.
  3. Click on Edit button on community and add your Vf page in "Inactive Site Home Page" and Save.
  4. Click on "URL Redirect" 
  5. Now add source URL (Ex. /Employee/login ) in Source URL text box and partial target URL in (Ex. /Employee/CommunityCustomLogin ) in Target URL text box and click save.
 Thanks,
Amit Chaudhary
Email:- amit.salesforce21@gmail.com

Monday, 1 December 2014

How to Setup Salesforce Community


Communities are a great way to share information and collaborate with people outside your company who are key to your business processes, such as customers or partners.

You can use Communities to:
  • Drive more sales by connecting your employees with your distributors, resellers, and suppliers
  • Deliver world-class service by giving your customers one place to get answers
  • Manage social listening, content, engagement, and workflow all in one place
How to enable communities 
  1. Go to Setup > App Setup > Customize > Communities > Settings
  2. Enable the checkbox "Enable communities"
  3. Register For Domain, Once enabled the communities it will ask for the domain name, show in picture. 

Creating Communities

1) Click Customize -> Communities -> All Communities, then click New Community.
2) Enter a community name. 

3) Enter a unique value at the end of the URL field.


Customizing Communities

You can customized following in community :-
Ø  Members
Ø  Tabs & Pages
Ø  Branding
Ø  Login & Registration
Ø  Emails
Ø  Miscellaneous


(I) Member :-
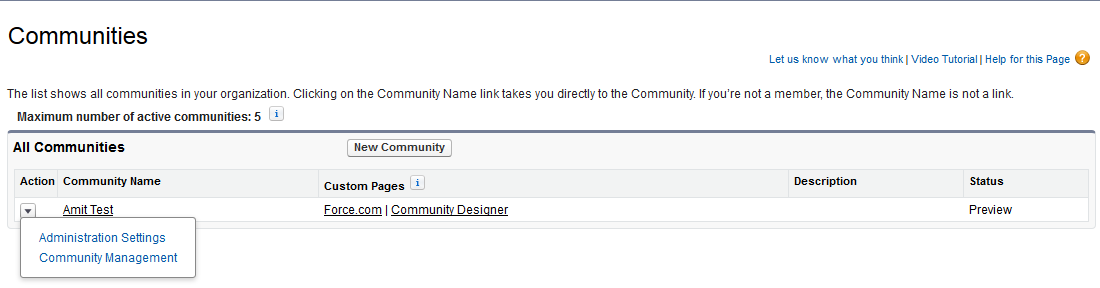
  1. Once you create new community then click on Customize -> Communities -> All Communities, then from the drop-down button next to the community name, select Administration Settings.
  2. Click on “Members” tab
  3. Once clicked on “Members” tab, it will show the screen as displayed in picture
  4. Select profile whom you want to provide community access.


Once you add a profile or permission set, all users assigned to that profile or permission set become members of the community.

(II)Tabs and Pages :-
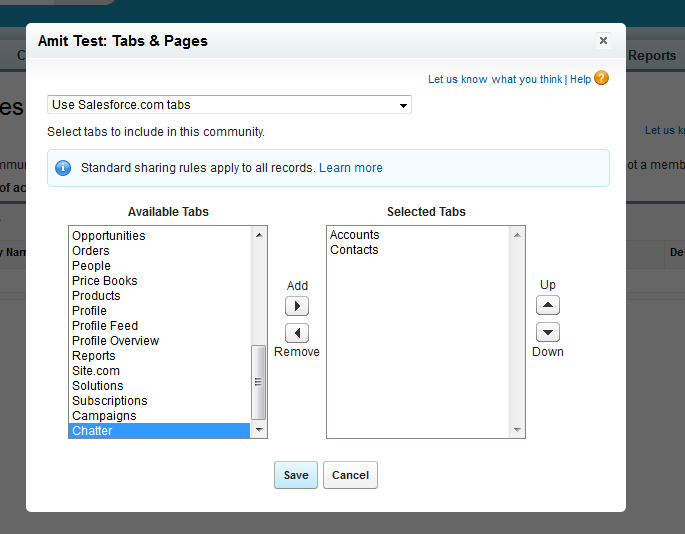
  1. From Setup, click Customize -> Communities -> All Communities, then from the drop-down button next to the community name, select Administration Settings.
  2. Now click on “Tabs and Pages”, it will show the screen displayed in picture
  3. Select all tab which you want to show in community.
  4. then Click on Save


(III) Custom Branding
  1. From Setup, click Customize -> Communities -> All Communities, then from the drop-down button next to the community name, select Administration Settings.
  2. Now click on “Branding”, 
  3. From here you can customize your headers and footers (formats are mentioned in picture) (which will be displayed on the native screens, and depends if you’ve applied on custom pages/tabs) and color theme to the community
  4. Then Save

(IV) Customize Login Page
  1. From Setup, click Customize -> Communities -> All Communities, then from the drop-down button next to the community name, select Administration Settings.
  2. Now click on “Login Page”, 
  3. Now you can give your company logo in login page. Whenever user open your community link, then you can show your company logo in header and show your content in footer.
  4. Then click on save

(V) Customizing Communities Email
  1. From Setup, click Customize | Communities | All Communities, then from the drop-down button next to the community name, select Administration Settings.
  2. Now click on “Emails”, 
  3. From here You can customize email sender information, Chatter email branding, and templates in your community emails. You can perform customizations in either the user interface or the Network object in Salesforce APIs.
  4. Click on save
(VI) Customize Communities Miscellaneous Settings
  1. From Setup, click Customize | Communities | All Communities, then from the drop-down button next to the community name, select Administration Settings.
  2. Now click on “Miscellaneous”
  3. Modify accordingly and click on save
Finally Publish It


View Global Header Permission Is No Longer On By Default


To enable View Globale Header permission you need to follow below step :-

1) Select profile
2) Select System Permission View Global Header
3) Then save.


Create New User

1.    Create a new account 
2.    Create a new contact record under newly created account 
3.    Open contact record and click on “Manage External User” and then click on “Enable Customer User” link, it will redirect you to user record    

4.    Click on Save button, 

NOTE :- Please ensure that the current logged in user should have a role to create this new user otherwise it will give you error.


Please do share your thoughts or problem you may face.


Thanks,
Amit Chaudhary
Email:- amit.salesforce21@gmail.com