Communities are a great
way to share information and collaborate with people outside your company who
are key to your business processes, such as customers or partners.
You can use Communities to:
- Drive more sales by connecting your employees with your
distributors, resellers, and suppliers
- Deliver world-class service by giving your customers
one place to get answers
- Manage social listening, content, engagement, and
workflow all in one place
How to enable
communities
- Go to Setup > App Setup > Customize > Communities > Settings
- Enable the checkbox "Enable communities"
- Register For Domain, Once enabled the communities it will ask for the domain name, show in picture.

Creating Communities
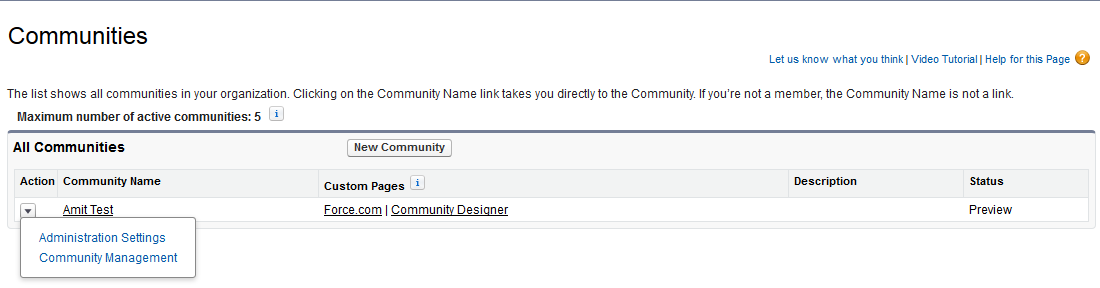
1) Click Customize -> Communities -> All Communities, then
click New Community.
2) Enter a community name.
3) Enter a unique value at the end of the URL field.

Customizing Communities
You can customized
following in community :-
Ø Members
Ø Tabs & Pages
Ø Branding
Ø Login & Registration
Ø Emails
Ø Miscellaneous
(I) Member :-
- Once you create new community then click on Customize -> Communities -> All Communities, then from the drop-down button next to the community name, select Administration Settings.
- Click on “Members” tab
- Once clicked on “Members” tab, it will show the screen as displayed in picture
- Select profile whom you want to provide community access.

Once you add a profile or permission set, all users assigned to that profile or permission set become members of the community.
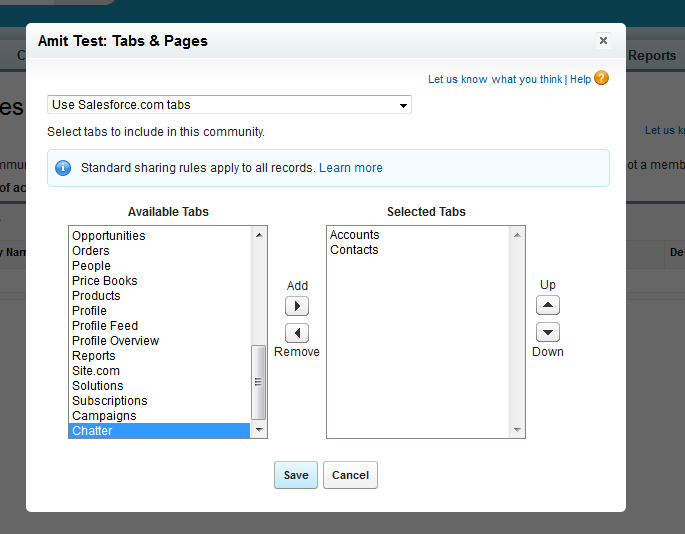
(II)Tabs and Pages :-
- From Setup, click Customize -> Communities -> All Communities, then from the drop-down button next to the community name, select Administration Settings.
- Now click on “Tabs and Pages”, it will show the screen displayed in picture
- Select all tab which you want to show in community.
- then Click on Save
(III) Custom Branding
- From Setup, click Customize -> Communities -> All Communities, then from the drop-down button next to the community name, select Administration Settings.
- Now click on “Branding”,
- From here you can customize your headers and footers (formats are mentioned in picture) (which will be displayed on the native screens, and depends if you’ve applied on custom pages/tabs) and color theme to the community
- Then Save

(IV) Customize Login Page
- From Setup, click Customize -> Communities -> All Communities, then from the drop-down button next to the community name, select Administration Settings.
- Now click on “Login Page”,
- Now you can give your company logo in login page. Whenever user open your community link, then you can show your company logo in header and show your content in footer.
- Then click on save

(V) Customizing Communities Email


To enable View Globale Header permission you need to follow below step :-
1) Select profile
2) Select System Permission View Global Header
3) Then save.
- From Setup, click Customize | Communities | All Communities, then from the drop-down button next to the community name, select Administration Settings.
- Now click on “Emails”,
- From here You can customize email sender information, Chatter email branding, and templates in your community emails. You can perform customizations in either the user interface or the Network object in Salesforce APIs.
- Click on save
(VI) Customize Communities Miscellaneous Settings
- From Setup, click Customize | Communities | All Communities, then from the drop-down button next to the community name, select Administration Settings.
- Now click on “Miscellaneous”
- Modify accordingly and click on save
View Global Header Permission Is No Longer On By Default
To enable View Globale Header permission you need to follow below step :-
1) Select profile
2) Select System Permission View Global Header
3) Then save.
Create New User
1.
Create a new
account
2.
Create a new contact
record under newly created account
3.
Open contact record and
click on “Manage External User” and then click on “Enable Customer User” link,
it will redirect you to user record
4.
Click on Save button,
NOTE :- Please ensure that the current logged in user should have a role to create this new user otherwise it will give you error.
Please do share your thoughts or problem you may face.
Thanks,
Amit Chaudhary
Email:- amit.salesforce21@gmail.com
Amit Chaudhary
Email:- amit.salesforce21@gmail.com
Workday Classes Online
ReplyDeleteLearn Workday HCM configuration, business processes, security, payroll, and reporting fundamentals. Build practical HR solutions, dashboards, and automated workflows through real-time hands-on exercises.
Great guide on setting up a Salesforce Community—very clear and easy to follow. Having a well-structured community portal can really enhance user engagement and support. This setup knowledge is also useful during transitions like migrating data from Salesforce to Zoho CRM, where maintaining seamless user access is important. Thanks for sharing these helpful steps!
ReplyDelete