Monday 26 November 2018

Lightning Testing Service (LTS) | Lightning Component Testing with Jasmine


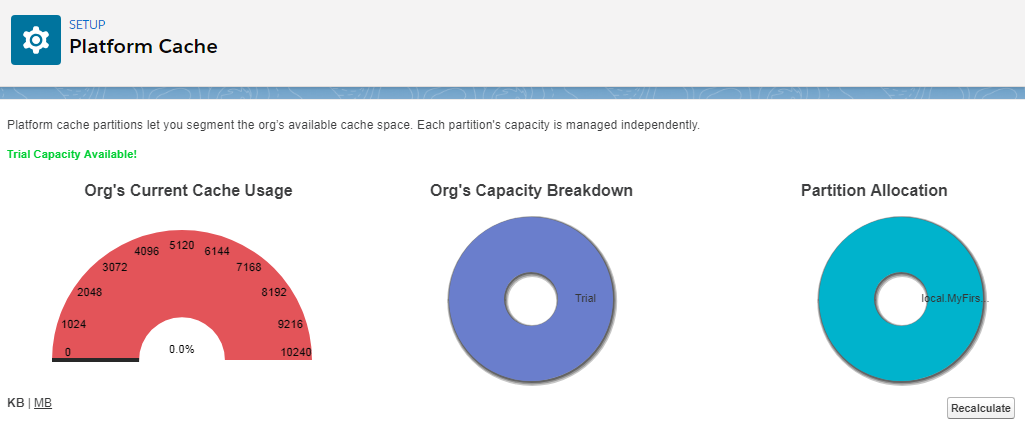
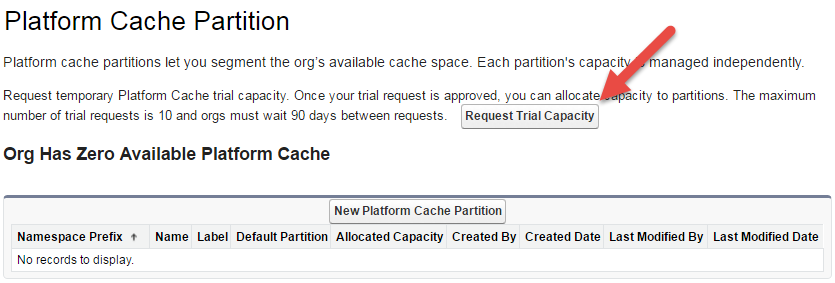
In out last post we discussed about Platform cache. And Today we will talk about Lightning Testing Service (LTS) .

What is Lightning Testing Service (LTS) ?


Lightning Testing Service (LTS) framework is a set of tools designed to help you to test the JavaScript in your Lightning Components. Using this tool will be very important in ensuring that your Lightning components behave as expected. Lightning Testing Service currently provides wrappers for Jasmine and Mocha, and you can create your own wrappers for other frameworks.

How to Setup LTS ?

Step 1) Install the LTS
You can install the Un-Managed Packaged from here.  I will recommend to install LTS with Example one.
Link :- https://github.com/forcedotcom/LightningTestingService/releases


or

You can install the same with the help of Salesforce-DX below command.

sfdx force:lightning:test:install


Step 2) Test Installation 

You test Installation by opening the below UTL
https://<BASE_URL>/c/jasmineTests.app

or

you can Test Installation with the help of salesforce-Dx below command

sfdx force:lightning:test:run -a jasmineTests.app


Step 3) Use Lightning Testing Service

Example 1) Verify component rendering and data binding

  • 1.1) Create Lightning Component for testing 
<aura:component>
    <aura:attribute name="msg" type="String"/>
    <lightning:input aura:id="messageInput" value="{!v.msg}"/>
    <div aura:id="msg">{!v.msg}</div>
</aura:component>

  • 1.2) Create your jasmine Script and Upload in Static Resource. 
describe('c:LTS_DataBinding', function () {
   it('verify data binding', function (done) {
      $T.createComponent('c:LTS_DataBinding', {msg: 'hello LTS'}, true)
         .then(function (component) {
            expect(component.find("msg").getElement().innerHTML).toBe('hello LTS');
            expect(component.find("messageInput").get("v.value")).toBe('hello LTS');
            done();
      }).catch(function (e) {
            done.fail(e);
      });
   });
});
  • 1.3) Run your jasmine Script with Lightning Application
<aura:application >
    <c:lts_jasmineRunner testFiles="{!join(',', 
     $Resource.LTS1
    )}" />
</aura:application>

Example 2) Test Init Method
  • 2.1) Create Lightning Component for testing
LTS_DataBinding.cmp

<aura:component >       
    <aura:attribute name="msg" type="String"></aura:attribute>
    <aura:handler name="init" value="{!this}" action="{!c.doInit}" />
    Here is welcome msg :- {!v.msg}
</aura:component>
 LTS_DataBindingController.js
({
        doInit: function(component, event, helper) {
                component.set('v.msg', 'Welcome in Apex Hours');
        }
})
  • 2.2) Create your jasmine Script and Upload in Static Resource. 

describe("LTS Examples 2", function() {
    afterEach(function() {
        $T.clearRenderedTestComponents();
    });

    describe('Rendering c:LTS_DataBinding', function(){
        it('LTS Test 2', function(done) {
            $T.createComponent("c:LTS_DataBinding", {}, true)
            .then(function(component) {
                expect(component.get('v.msg')).toContain("Apex Hours");
                done();
            }).catch(function(e) {
                done.fail(e);
            });
        });
    });
});
  • 2.3) Run your jasmine Script with Lightning Application
<aura:application >
    <c:lts_jasmineRunner testFiles="{!join(',', 
     $Resource.LTS2
    )}" />
</aura:application>


Limitation/ Gotchas :-
  1. Do not install the LTS in Production.
  2. Do not use LTS to test your server side code. As LTS will not rollback any record created by Apex.
  3. LTS will not provide any kind of code coverage.  


On March 2018 we did a session on "Lightning Testing Service (LTS)" in our Salesforce Apex Hours Online event.

Here is Recording of that session :-


Please join our YouTube Channel.

RELATED POSTS

1) Getting Started with the Lightning Testing Service
2) Lightning Testing Service Github Repo
3) Introduction to Lightning Test Services with Jasmine


Thanks,
Amit Chaudhary

Capture.JPG  @amit_sfdc    @ApexHours
  Salesforce Apex Hours 
    #SalesforceApexHours  

Thursday 15 November 2018

Platform Cache in Salesforce | Platform Cache Basics


What is Platform Cache ?

"Platform Cache" is a memory layer that store's Salesforce session and org data for later access. "Platform Cache" is just like a RAM for your app. With Platform Cache, your applications can run faster because they store reusable data in memory. "Platform Cache" is used to to store Static Data, complex computations  and Frequently used data.

Point for consideration and Best Practices :-
  • Performance , Enterprise and Unlimited Org have default cache space included.
  • ISV's can buy cache for there application .
  • Sold in 10 MB blocks. 
  • Data is not persisted, There is no guaranty of data loss
  • Session Data can be stored up to 8 hours only.
  • Org cache can store up to 48 hours.
  • $Cache.Session Global Variable can be used in Visualforce Pages.
  • Store Data That Doesn’t Change Often
  • Data in the cache isn’t encrypted
  • Partition Size Limits :- 5 MB per Partition.
  • Maximum size of a single cached item 100KB

Type of Platform Cache :-
1) Org Cache :- Org wide data for anyone in the org
2) Session Cache :- Data for a specific user stored up to 8 hours.

How to Setup Platform Cache :-
Step 1) Click on Setup then Type "Platform Cache" in Quick Find. Then click on "Platform Cache"
Step 2) Request for Free Trial if "Platform Cache" is not available for your org (Optional Step)

Step 3) Then click on "New Platform Cache Partition" and the provide the "Name" all required detail
Step 4) Make the first Partition as Default Partition.


Store and Retrieve Data in Org Cache :-

After partitions setup, we can use the Cache.SessionPartition and Cache.OrgPartition class's to add, retrieve, or remove values from a partition’s cache. Use Cache.Session and Cache.Org classes to get a partition or perform cache operations by using a fully qualified key.


Handling Session cache:-

// Add a value to the cache . local is the default name space cache
Cache.Session.put('local.MyFirstPartition.key', '1234567');

// Check value is there in Cache
if (Cache.Session.contains('local.MyFirstPartition.key')) {
    // get Cache value
    String key = (String)Cache.Session.get('local.MyFirstPartition.key');
}

Handling Org Cache:-


// Get partition
Cache.OrgPartition orgPart = Cache.Org.getPartition('local.MyFirstPartition');

// Add cache value to the partition
orgPart.put('key','welcome');

// Retrieve cache value from the partition
if (orgPart.contains('key')) {
    String key = (String)orgPart.get('key');
}

Reference
1) https://trailhead.salesforce.com/content/learn/modules/platform_cache/platform_cache_get_started
2) https://developer.salesforce.com/docs/atlas.en-us.apexcode.meta/apexcode/apex_platform_cache_session_examples.htm


Please join our YouTube Channel. Please check below related post

1Component Event in Lightning Component | aura:event  
2) Invoke Apex from Lightning Component
3) Design Resource In Lightning Component Bundle
4) Create and Destroy Modal Dialog Component

5) Inheritance In Lightning Component
6) Dynamic Picklists in Custom Component Property


Thanks,
Amit Chaudhary

Capture.JPG  @amit_sfdc    @ApexHours
  Salesforce Apex Hours 
    #SalesforceApexHours 

Wednesday 7 November 2018

Lightning Bolt Solution in Salesforce | Lightning Community


Lightning Bolt Solution

Lightning Bolt - new framework for deploying next generation communities and portals quicker. Lightning Bolt for Salesforce allows you to quickly build and distribute industry-specific Lightning Bolt Solutions to jump-start new org capabilities. Save time by building once then reusing. Lightning bolt solution should be combination of one or more following iteams
1) Community Template
2) Flow
3) Custom Apps


Please follow  below step to setup Lightning Bolt Solution
Step 1) Create Community and do all changes what you want to do.
Setup--> Community --> New community


Step 2) Export the Community Template.
Once all changes done click on Setting and the click on Developer, Then provide all required detail


Step 3) Now Create Bolt Solution
Setup--> Lightning Bolt Solution --> Then on detail Branding page enter information about your Lightning Bolt Solution.
Then Select the template which we export
So Finally your Lightning Bolt Solution is ready

Step 4) If you want to share same Lightning bolt solution with some . Then you can create one manage package and share.


Please check below recording for how to setup Lightning Bolt Solution Here is Recording


Reference :-
1) https://releasenotes.docs.salesforce.com/en-us/winter17/release-notes/rn_networks_builder_template_export.htm

Please join our YouTube Channel.

Please provide your comment and feedback.


Thanks,
Amit Chaudhary

Capture.JPG  @amit_sfdc    @ApexHours
  Salesforce Apex Hours 
    #SalesforceApexHours