Showing posts with label lightning web component. Show all posts

Monday, 3 August 2020

Modal/Popup in Lightning Web Component (LWC)

In this post we will talk about how to create modal/Popup in Lightning web Component (LWC). Currently "lightning:overlayLib" is not available in LWC, the only way to show modals and popups is through styling and making a custom html modal. Modals/Popup Box are used to display content in a layer above the app. Mostly used to creation or editing of a record, as well as various types of messaging and wizards.


If you want to know how to create Modal in Lightning aura component, please refer to this post.


Modal / Popup Example Lightning Web component(LWC)


You can take a help from SLDS for creating the modals. Code has following three main part
  • section
  • header
  • footer

Create Lightning web component in your sandbox or developer org.

modalDemoInLWC.html
<template>
    <lightning-button variant="success" label="Open popup"
                        title="Open popup" onclick={showModalBox}>
    </lightning-button>

   <!-- modal start -->      
   <template if:true={isShowModal}>

            <!--
                I Used SLDS for this code
                Here is link https://www.lightningdesignsystem.com/components/modals/
            --> 

    <section role="dialog" tabindex="-1" aria-labelledby="modal-heading-01" aria-modal="true" aria-describedby="modal-content-id-1" class="slds-modal slds-fade-in-open">
       <div class="slds-modal__container">
        <!-- modal header start -->
          <header class="slds-modal__header">
             <button class="slds-button slds-button_icon slds-modal__close slds-button_icon-inverse" title="Close" onclick={hideModalBox}>
                <lightning-icon icon-name="utility:close"
                   alternative-text="close"
                   variant="inverse"
                   size="small" ></lightning-icon>
                <span class="slds-assistive-text">Close</span>
             </button>
             <h2 id="modal-heading-01" class="slds-text-heading_medium slds-hyphenate">Welcome in Apex Hours</h2>
          </header>
      
          <!-- modal body start -->
          <div class="slds-modal__content slds-p-around_medium" id="modal-content-id-1">
                <p>Modal/Popup in Lightning Web Component (LWC) Demo</p>
          </div>

          <!-- modal footer start-->
          <footer class="slds-modal__footer">
             <button class="slds-button slds-button_neutral" onclick={hideModalBox}>Cancel</button>
          </footer>
       
       </div>
    </section>
    <div class="slds-backdrop slds-backdrop_open"></div>
 </template>
 <!-- modal end -->

</template>
  • Enable and disable the modal with template if:true
  • Use section role='dialog'

modalDemoInLWC.js
import { LightningElement,track } from 'lwc';

export default class ModalDemoInLWC extends LightningElement {
    @track isShowModal = false;

    showModalBox() {  
        this.isShowModal = true;
    }

    hideModalBox() {  
        this.isShowModal = false;
    }
}

modalDemoInLWC.js-meta.js
<?xml version="1.0" encoding="UTF-8"?>
<LightningComponentBundle xmlns="http://soap.sforce.com/2006/04/metadata">
    <apiVersion>48.0</apiVersion>
    <isExposed>true</isExposed>
      <targets>
        <target>lightning__AppPage</target>
        <target>lightning__RecordPage</target>
        <target>lightning__HomePage</target>
    </targets>
</LightningComponentBundle>


Wednesday, 1 July 2020

Lazy loading in Lightning Web Component

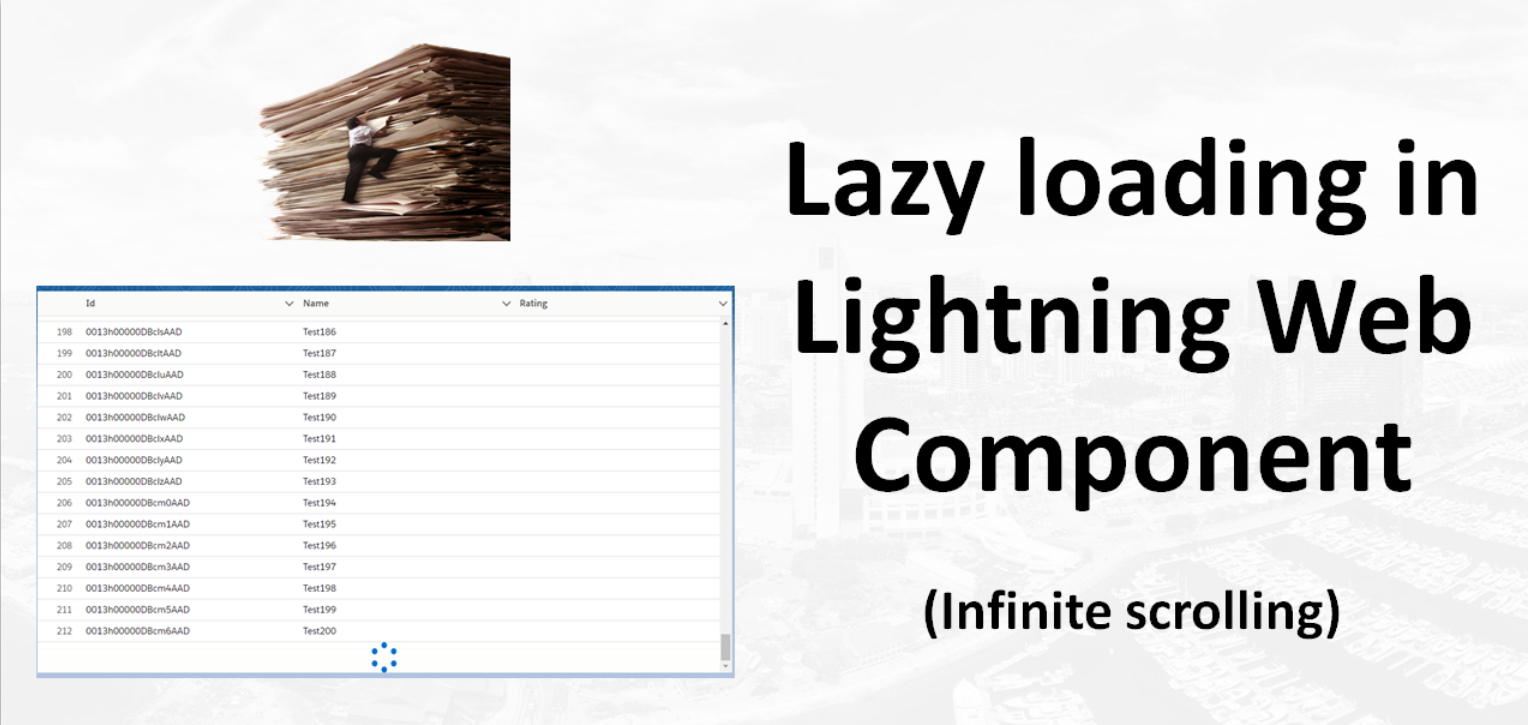
 In this post we will talk about How to implement Infinity or lazy loading in Lightning Web Component using Lightning Datatable. Lazy loading helps you to load the data only when it is required. Infinite scrolling (enable-infinite-loading) enables you to load a subset of data and then load more data when users scroll to the end of the table.

In this post we will learn about lightning datatable attributes enable-infinite-loading and load more offset.
  • enable-infinite-loading : You can load a subset of data and then display more
    when users scroll to the end of the table. Use with the onloadmore event handler to retrieve more data
  • load-more-offset : Determines when to trigger infinite loading based on how many pixels the table's scroll position is from the bottom of the table. The default is 20
  •  onloadmore : The action triggered when infinite loading loads more data
In below image you can check the demo for Lightning Data Table With Lazy Loading. As we load data partially and once the user scrolls down at the end then we load the next set of data. So it is very responsive.


Lets see how we can implement the same.

Step 1) Apex Class with offSet


LazyLoadingController


public with sharing class LazyLoadingController {

    @AuraEnabled(cacheable=true)
    public static List<Account> getAccounts(Integer limitSize, Integer offset){
        List<Account> accountList = [SELECT Id,Name,Rating
                                     FROM Account
                                     ORDER BY CreatedDate
                                     LIMIT :limitSize
                                     OFFSET :offset
                                     ];
        return accountList;
    }
}
We will call same apex class from lightning web component.

Step 2) Lightning web component with Datatable


Create lightning web component in your sandbox or developer org. If you new please check this post how to create lightning web component in non-scratch org.

lazyLoadingLWCDemo.html

<template>
    <div style="height:500px">
    <lightning-datatable key-field="Id"
            data={accounts}
            columns={columns}
            enable-infinite-loading
            onloadmore={loadMoreData}
            hide-checkbox-column="true"
            show-row-number-column="true">
    </lightning-datatable> 
</div>
</template>
To enable infinite scrolling, specify enable-infinite-loading and provide an event handler using onloadmore.


lazyLoadingLWCDemo.js

import { LightningElement, track, wire } from 'lwc';
import getAccounts from '@salesforce/apex/LazyLoadingController.getAccounts';

const columns = [
    { label: 'Id', fieldName: 'Id', type: 'text' },
    { label: 'Name', fieldName: 'Name', type: 'text'},
    { label: 'Rating', fieldName: 'Rating', type: 'text'}
  
];

export default class LazyLoadingLWCDemo extends LightningElement {
    accounts=[];
    error;
    columns = columns;
    rowLimit =25;
    rowOffSet=0;
  
    connectedCallback() {
        this.loadData();
    }

    loadData(){
        return  getAccounts({ limitSize: this.rowLimit , offset : this.rowOffSet })
        .then(result => {
            let updatedRecords = [...this.accounts, ...result];
            this.accounts = updatedRecords;
            this.error = undefined;
        })
        .catch(error => {
            this.error = error;
            this.accounts = undefined;
        });
    }

    loadMoreData(event) {
        const currentRecord = this.accounts;
        const { target } = event;
        target.isLoading = true;

        this.rowOffSet = this.rowOffSet + this.rowLimit;
        this.loadData()
            .then(()=> {
                target.isLoading = false;
            });   
    }


}
We create connectedCallback function to load the initial data and then we are useing loadmoreData function to load more record from Apex base on offset. The onloadmore event handler retrieves more data when you scroll to the bottom of the table until there are no more data to load. To display a spinner while data is being loaded, set the isLoading property to true


lazyLoadingLWCDemo.js-meta.xml
<?xml version="1.0" encoding="UTF-8"?>
<LightningComponentBundle xmlns="http://soap.sforce.com/2006/04/metadata">
    <apiVersion>48.0</apiVersion>
    <isExposed>true</isExposed>
    <targets>
        <target>lightning__AppPage</target>
        <target>lightning__RecordPage</target>
        <target>lightning__HomePage</target>
    </targets>  
</LightningComponentBundle>


Reference blog
  1. Datatable
  2. OffSet

Further Learning
  1. Lightning datatable In Lightning Web Components
  2. Lightning Datatable Sorting in Lightning Web Components


Please share your feedback and let me know if this code can be improve.

Friday, 18 October 2019

Lightning Message Service (LMS) | MessageChannel

In Winter 20 Salesforce Introduce the new feature Lightning Message Service and it is generally available in Summer 20. Lightning Message Service (LMS) allow you to communicate between Visualforce and Lightning Components (Aura and LWC both) on any Lightning page. LMS API allow you to publish message throughout the lightning experience and subscribe the same message anywhere with in lightning page. It is similar to Aura Application Events to communication happens between components.


Lightning Message Service is based on a new metadata type: Lightning Message Channels. We need to use Lightning Message Channel to access the Lightning Message Service API.
  1. In LWC we can access Lightning Message Channel with the scoped module @salesforce/messageChannel
  2. In Visualforce, we can use global variable $MessageChannel
  3. In Aura, use lightning:messageChannel in your component


When to use Lightning Message Service. 

In Lightning Experience, if we want a Visualforce page to communicate with a Lightning web component then we have to implement a custom publish-subscribe solution because this is currently not possible with LWC Event. Now, we can use the Lightning Message Service API to handle this communication.
Lightning Message Service LMS and Message Channel


Let see how we can implements this

Create Lightning Message Channel :-

Currently we can create Lightning Message channel with Metadata API. You can create the same with the help of VsCode. I hope you have VsCode installed in your machine if not please check this post. You need to create one DX project then you need to place your message channel definition with the suffix .messageChannel-meta.xml in the force-app/main/default/messageChannels directory. like below folder structure.

MyMessageChannel.messageChannel-meta.xml
<?xml version="1.0" encoding="UTF-8"?>
<LightningMessageChannel xmlns="http://soap.sforce.com/2006/04/metadata">
   <masterLabel>MyMessageChannel</masterLabel>
   <isExposed>true</isExposed>
   <description>This Lightning Message Channel sends information from VF to LWC</description>

   <lightningMessageFields>
       <fieldName>messageToSend</fieldName>
       <description>message To Send</description>
   </lightningMessageFields>

   <lightningMessageFields>
       <fieldName>sourceSystem</fieldName>
       <description>My source?</description>
   </lightningMessageFields>

</LightningMessageChannel>

And Package.xml should be like below
package.xml
<?xml version="1.0" encoding="UTF-8" standalone="yes"?>
<Package xmlns="http://soap.sforce.com/2006/04/metadata">
    <types>
       <members>*</members>
       <name>LightningMessageChannel</name>
    </types>
    <version>47.0</version>
</Package>
Right click on LightningMessageChannel file and Deploy in Org.


Create Visualforce page and LWC


1) LMS with Visualforce page

Salesforce introduced new sforce.one APIs — publish, subscribe, and unsubscribe — in Visualforce to interact with LMS (only available in Lightning).

LMSVisualforcePage.page
<apex:page>
  
    <div>
        <p>Enter Your Message Here:</p>
        <input type="text" id="theMessage" />
        <button onclick="publishMC()"> Publish Msg</button>
        <br/><br/>
            <button onclick="subscribeMC()">Subscribe</button>
            <button onclick="unsubscribeMC()">Unsubscribe</button>
        <br/>
        <br/>
        <p>Received message:</p>
        <label id="MCMessageText"/>
    </div>
  
    <script>
      
        // Load the MessageChannel token in a variable
        var SAMPLEMC = "{!$MessageChannel.MyMessageChannel__c}";
        var subscriptionToMC;

        function publishMC() {
            const message = {
                messageToSend: document.getElementById('theMessage').value,
                sourceSystem: "From VisualForce Page"
            };
            sforce.one.publish(SAMPLEMC, message);
        }
      
        // Display message in the textarea field
        function displayMessage(message) {
            var textLabel = document.querySelector("#MCMessageText");
            textLabel.innerHTML = message ? JSON.stringify(message, null, '\t') : 'no message payload';
        }

        function subscribeMC() {
            if (!subscriptionToMC) {
                subscriptionToMC = sforce.one.subscribe(SAMPLEMC, displayMessage);
            }
        }

        function unsubscribeMC() {
            if (subscriptionToMC) {
                sforce.one.unsubscribe(subscriptionToMC);
                subscriptionToMC = null;
            }
        }

    </script>

</apex:page>

  • "subscribeMC" method is used to subscribe the Message Channel with "sforce.one.subscribe(SAMPLEMC, displayMessage);"
  • "unsubscribeMC" method to unsubscribe the Message Channel with "sforce.one.unsubscribe(subscriptionToMC);"
  • "publishMC" to publish the message withe the help of "sforce.one.publish(SAMPLEMC, message);"

2) LMS with Lightning Web Components

lMCWebComponentDemo.js
import { LightningElement,track } from 'lwc';
import { publish,subscribe,unsubscribe,createMessageContext,releaseMessageContext } from 'lightning/messageService';
import SAMPLEMC from "@salesforce/messageChannel/MyMessageChannel__c";

export default class LMCWebComponentDemo extends LightningElement {
    @track receivedMessage = '';
    @track myMessage = '';
    subscription = null;
    context = createMessageContext();

    constructor() {
        super();
    }

    handleChange(event) {
        this.myMessage = event.target.value;
    }

    publishMC() {
        const message = {
            messageToSend: this.myMessage,
            sourceSystem: "From LWC"
        };
        publish(this.context, SAMPLEMC, message);
    }

    subscribeMC() {
        if (this.subscription) {
            return;
        }
        this.subscription = subscribe(this.context, SAMPLEMC, (message) => {
            this.displayMessage(message);
        });
     }
 
     unsubscribeMC() {
         unsubscribe(this.subscription);
         this.subscription = null;
     }

     displayMessage(message) {
         this.receivedMessage = message ? JSON.stringify(message, null, '\t') : 'no message payload';
     }

     disconnectedCallback() {
         releaseMessageContext(this.context);
     }

}
  • First, we have to ensure that we import both the methods to interact with LMS
    import { publish,subscribe,unsubscribe,createMessageContext,releaseMessageContext } from 'lightning/messageService';
    import SAMPLEMC from "@salesforce/messageChannel/MyMessageChannel__c";

lMCWebComponentDemo.html
<template>
    <lightning-card title="LMC Web Component" icon-name="custom:custom14">
        <div class="slds-m-around_medium">
            <p>MessageChannel: MyMessageChannel__c</p>
            <br>
        </div>
        <!-- Default/basic -->
        <div class="slds-p-around_medium lgc-bg">
            <lightning-input type="text" label="Enter some text" value={myMessage} onchange={handleChange}></lightning-input>
            <lightning-button label="Publish" onclick={publishMC}></lightning-button>
        </div>

        <div class="slds-p-around_medium lgc-bg">
            <lightning-button label="Subscribe" onclick={subscribeMC}></lightning-button>
            <lightning-button label="Unsubscribe" onclick={unsubscribeMC}></lightning-button>
            <p>Latest Message Received</p>
            <lightning-formatted-text value={receivedMessage}></lightning-formatted-text>
        </div>

    </lightning-card>
</template>


Reference:

Some other related post:
  1. Event Communication in Lightning Web Components
  2. Event Communication in Lightning Components
  3. Setup VsCode for Salesforce
  4. Lightning We Components

Thanks
Amit Chaudhary


Thursday, 17 October 2019

Lightning datatable In Lightning Web Components | lightning datatable inline edit

Welcome back, In this post we are going to create another lightning web component (LWC), Where we can search contact records and will display result using lightning-datatable lwc component. Lightning datatable tag is same as lightning:datatable tag in aura. In this lightning Datatable example we will also talk about lightning datatable inline edit.

lighning-datatable syntax:-
                    <lightning-datatable key-field="Id" 
                                            data={contacts} 
                                            columns={columns} 
                                            hide-checkbox-column="true" 
                                            show-row-number-column="true"
                                            > 
                    </lightning-datatable> 
  • If you want to hide the checkbox from table then add "hide-checkbox-column"
  • If you want to show row number then please add "show-row-number-column".
Let's see how we can create custom record search functionality in lightning web components. I hope VsCode is already setup on you machine and you know how to create Lightning Web Component. If not please check this post.

1) Create Apex Class

public with sharing class LWCDataTableExample {
    @AuraEnabled(Cacheable=true)
    public static List <Contact> getContacts(String strLastName) {
        String strLastNameLike = '%'+strLastName+'%';
        List<Contact> contList = [SELECT Id,FirstName,LastName,Account.Name
                                   FROM Contact
                                   Where LastName like :strLastNameLike
                                   LIMIT 10];
        return contList;
    }   
}

This apex class we will call from Lightning web components. If you want to learn more about how to call apex class from lightning web components then please check this post.

2) Create Lightning Web Components.

lwcLightningDataTableDemo.html
<template>
    <lightning-card title = "Search Contacts" icon-name = "custom:custom63"> 
        <div class = "slds-m-around_medium"> 
            <lightning-input type = "search" onchange = {handleKeyChange} class = "slds-m-bottom_small" label = "Search" >
            </lightning-input> 
            <template if:true = {contacts}> 
                <div style="height: 300px;"> 
                    <lightning-datatable key-field="Id" 
                                            data={contacts} 
                                            columns={columns} 
                                            hide-checkbox-column="true" 
                                            show-row-number-column="true"> 
                    </lightning-datatable> 
                </div>                  
            </template>
            <template if:true = {error}> 
                {error}> 
            </template> 
        </div> 
    </lightning-card> 
</template>


lwcLightningDataTableDemo.js
import { LightningElement,track } from 'lwc';
import getContacts from '@salesforce/apex/LWCDataTableExample.getContacts';

const columns = [ 
    { label: 'Id', fieldName: 'Id' }, 
    { label: 'First Name', fieldName: 'FirstName' }, 
    { label: 'Last Name', fieldName: 'LastName' }
];

export default class LwcLightningDataTableDemo extends LightningElement {
    @track contacts;
    @track error; 
    @track columns = columns;
   
    handleKeyChange( event ) { 
        const strLastName = event.target.value; 
        if ( strLastName ) { 
            getContacts( { strLastName } )   
            .then(result => { 
                this.contacts = result; 
                console.log('I am here',this.contacts);
               // console.log(JSON.stringify(result, null, '\t'));
   
            }) 
            .catch(error => { 
                this.error = error; 
            }); 
        } else 
        this.contacts = undefined; 
    }
}

lwcLightningDataTableDemo.js-meta.xml
<?xml version="1.0" encoding="UTF-8"?>
<LightningComponentBundle xmlns="http://soap.sforce.com/2006/04/metadata" fqn="lwcLightningDataTableDemo">
    <apiVersion>47.0</apiVersion>
    <isExposed>true</isExposed>
    <targets>
        <target>lightning__AppPage</target>
        <target>lightning__RecordPage</target>
        <target>lightning__HomePage</target>
        <target>lightning__Tab</target>
    </targets>

</LightningComponentBundle>

NOTE:- Now from Winter 20 release we can Add Lightning Web Components as Custom Tabs for that we need to add lightning__Tab target to the component’s configuration file.

Now Your page will look like this


Lightning datatable inline edit


Let's see how we can do inline Edit
  • For inline editing we can use the uiRecordAPI. For that we need to import the "lightning/uiRecordApi"
  • We also need to add "onsave={handleSave}" and "draft-values={draftValues}"on lightning-datatable and on column we need to add enable "editable: true".
  • Then we need to add handler Save method.

Let's see how our code will look like:


lwcLightningDataTableDemo.html
<template>
    <lightning-card title = "Search Contacts" icon-name = "custom:custom63"> 
        <div class = "slds-m-around_medium"> 
            <lightning-input type = "search" onchange = {handleKeyChange} class = "slds-m-bottom_small" label = "Search" >
            </lightning-input> 
            <template if:true = {contacts}> 
                <div style="height: 300px;"> 
                    <lightning-datatable key-field="Id" 
                                            data={contacts} 
                                            columns={columns} 
                                            hide-checkbox-column="true" 
                                            show-row-number-column="true"
                                            onsave={handleSave}
                                            draft-values={draftValues}
                                            > 
                    </lightning-datatable> 
                </div>                  
            </template>
            <template if:true = {error}> 
                {error}> 
            </template> 
        </div> 
    </lightning-card> 
</template>


lwcLightningDataTableDemo.js
import { LightningElement,track } from 'lwc';
import getContacts from '@salesforce/apex/LWCDataTableExample.getContacts';

import { updateRecord } from 'lightning/uiRecordApi';
import { refreshApex } from '@salesforce/apex';
import { ShowToastEvent } from 'lightning/platformShowToastEvent';


const columns = [ 
    { label: 'Id', fieldName: 'Id' }, 
    { label: 'First Name', fieldName: 'FirstName', editable: true  }, 
    { label: 'Last Name', fieldName: 'LastName', editable: true  }
];

export default class LwcLightningDataTableDemo extends LightningElement {
    @track contacts;
    @track error; 
    @track columns = columns;
    @track draftValues = [];
    handleKeyChange( event ) { 
        const strLastName = event.target.value; 
        if ( strLastName ) { 
            getContacts( { strLastName } )   
            .then(result => { 
                this.contacts = result; 
                // console.log('I am here',this.contacts);
                // console.log(JSON.stringify(result, null, '\t'));
            }) 
            .catch(error => { 
                this.error = error; 
            }); 
        } else 
        this.contacts = undefined; 
    }

    handleSave(event) {
        const recordInputs =  event.detail.draftValues.slice().map(draft => {
            const fields = Object.assign({}, draft);
            return { fields };
        });
   
        const promises = recordInputs.map(recordInput => updateRecord(recordInput));
       
        Promise.all(promises).then(contacts => {
            this.dispatchEvent(
                new ShowToastEvent({
                    title: 'Success',
                    message: 'All Contacts updated',
                    variant: 'success'
                })
            );
             // Clear all draft values
             this.draftValues = [];
   
             // Display fresh data in the datatable
             return refreshApex(this.contact);
        }).catch(error => {
            // Handle error
        });
    }


}

Please check below post on Lightning Web Components:-

Check our YouTube Channel for more recording in Lightning Web Components.

Reference :-
1) https://developer.salesforce.com/docs/component-library/bundle/lightning-datatable/example
2) https://developer.salesforce.com/docs/component-library/documentation/lwc/data_table_inline_edit


Please share your feedback.

Thursday, 28 March 2019

Lightning Web Components Best practices


We did one live session on Lightning Web Components (LWC) best practices with "René Winkelmeyer" in ApexHours. In that session we talk about how to build rich, efficient, and resilient Lightning Web Components. That webinar covered best practices around
  1. Using public, and private properties for effective component composition.
    1. When we should use @api or @track variable
  2. Event communication for child-to-parent as well as for sibling components (pubsub).
    1. Parent to Child Communication
    2. Child to Parent Communication
    3.  pubsub
  3. When, and when not, to use Apex with Lightning Web Components
    1. UI Record Api in LWC
    2. Lightning Data Service in LWC (Lightning record form)
  4. Aura interoperabilitys Recipes, Patterns and Best Practices
  5. How to debug Lightning Web Components
  6. How to test Lightning Web Component (Lightning Testing Service)
    1. Jest Tests for Lightning Web Components ( LTS )
       
Here is some best practice :-

1) LWC component Bundle naming convention 

 Check this post to learn about what is camelCase, PascalCase and kebab-case.
  1. Html file : Use camel case to name your component and use kebab-case to reference a component in the markup
  2. JavaScript File : Java Script Class name should be in PascalCase
  3. Bundle Component : use camelCase.  

2) Apex

There are two way to call Apex class in Lightning web component.
  1. Imperatively
  2. Wire 
    1. Wire a property
    2. Wire a function  

Wire Vs Imperatively :

As per Lightning component best practices use @wire over imperative method invocation. @wire fits nicely in the overall Lightning Web Component reactive architecture. Salesforce is building some performance enhancement features that are only available with @wire. But there are a few use cases,, that require you to use imperative Apex.

Wire Property Vs Wire Function :

Prefer wiring to a property. This best practice applies to @wire in general (not just to wiring Apex methods).

3) Lightning Data Service

As per LWC best practice use Lightning Data Service functions to create,Record, and delete a record over invoking Apex methods. Yes there are some use cases where you need to multiple records then we can use Apex methods.

Lightning Data Service is built on top of User Interface API. UI API is a public Salesforce API that Salesforce uses to build Lightning Experience. Like its name suggests, UI API is designed to make it easy to build Salesforce UI. UI API gives you data and metadata in a single response

Give preference to user interface form-type in below order.
  1. lightning-record-form : It is the fastest/most productive way to build a form.
  2. lightning-record-view-form : If you need more control over the layout, want to handle events on individual input fields, or need to execute pre-submission
  3. @wire(getRecord) : If you need even more control over the UI, or if you need to access data without a UI

4) Event in LWC


There are typically 3 approaches for communication between the components using events.
  1. Communication using Method in LWC ( Parent to Child )
  2. Custom Event Communication in Lightning Web Component (Child to Parent )
  3. Publish Subscriber model in Lightning Web Component ( Two components which doesn't have a direct relation )
Here is some recommendation for DOM Event.
  1. No uppercase letters
  2. No Spaces
  3. use underscores to separate words
  4. Don't prefix your event name with string "on".

5) Streaming API, Platform Event, Change Data Capture


The lightning/empApi module provides access to methods for subscribing to a streaming channel and listening to event messages. All streaming channels are supported, including channels for platform events, PushTopic events, generic events, and Change Data Capture events. This component requires API version 44.0 or later. The lightning/empApi module uses a shared CometD connection. Example Code.

6) How to debug LWC

Use Chrome pretty JS setting to see unminified JavaScript and Debug Proxy Values for Data. Here is example.
  • Enable Debug mode
    • It gives unminified Javascript
    • Console warnings
    • Pretty data structure
  • Caution - it reduces performance of Salesforce, make sure its disabled in production

7) Use Storable Action

Use Storable Action, It will reduces call to Server. Syntax - @AuraEnabled(cacheable=true)

Caution: A storable action might result in no call to the server. Never mark as storable an action that updates or deletes data.
For storable actions in the cache, the framework returns the cached response immediately and also refreshes the data if it’s stale. Therefore, storable actions might have their callbacks invoked more than once: first with cached data, then with updated data from the server.


Some more key point
  1. Use Playground to markup Custom Components
  2. Use Local Development 
  3. Refer Lightning Web Component Recipe for best practices

Recording

Here is recording of session.


If you missed our first session on Introduction to Lightning Web component then please check our this recording.


Further Learning :

1) Introducing Lightning Web Components Recipes, Patterns and Best Practices


Please check below post on Lightning Web Components:-
  1. Lightning Web Components ( LWC ) in Salesforce with Non-Scratch Org
  2. Design attributes in Lightning Web Components | CSS and SVG Files | Lightning Web Components | targetConfigs
  3. Toast Notification in Lightning Web Components | ShowToastEvent |  (LWC)


Thanks,
Amit Chaudhary