Force.com platform support powerful web services API for interaction with external app and salesforce.com . For secured interaction with third party app, Salesforce enforces authentication process.

Above image is picked from here.
If you want to configure the same the help of recording. Click here for recording.
Step 1) Connected App for OAuth
To perform OAuth in salesforce, you must create Connected App in salesforce
Follow below step to create connected App.
1) Click on Setup->Create->App

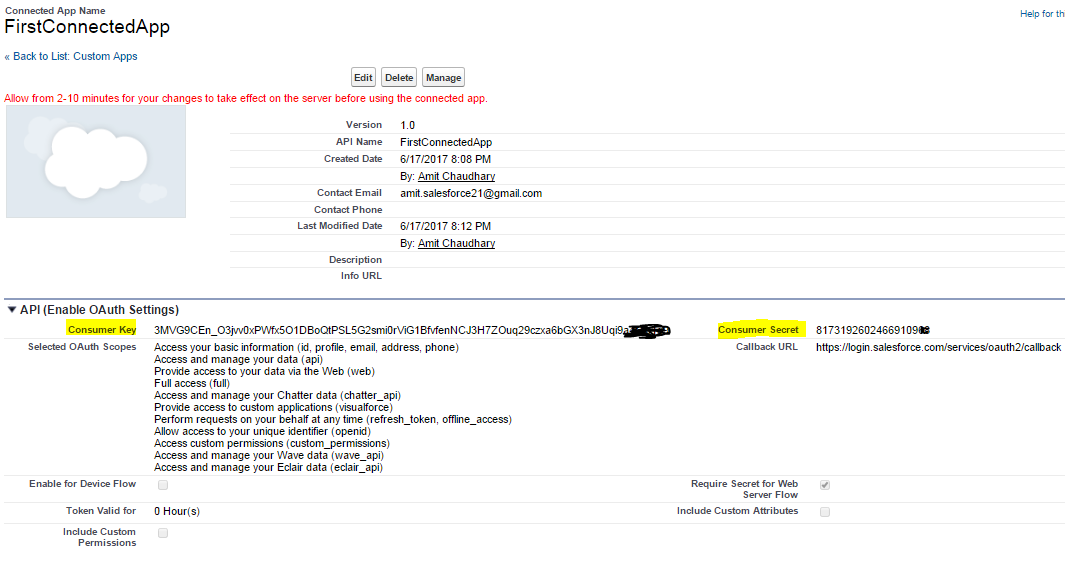
2) Then from above screen click on Connect Apps then New button. Then add all required information like below

3) Now After creating connected App we have consumer key and consumer secret
Step 2) Create a REST API in salesforce.
Please check below post for REST API
1) Learn Rest API in salesforce | How to learn Rest API | Rest API in salesforce
2) Rest API in Salesforce | Execute Rest API on workbench | Test class for Rest API
Sample code to Start
@RestResource(urlMapping='/api/Account/*')
global with sharing class MyFirstRestAPIClass
{
@HttpGet
global static Account doGet()
{
RestRequest req = RestContext.request;
RestResponse res = RestContext.response;
String AccNumber = req.requestURI.substring(req.requestURI.lastIndexOf('/')+1);
Account result = [SELECT Id, Name, Phone, Website FROM Account WHERE AccountNumber = :AccNumber ];
return result;
}
@HttpDelete
global static void doDelete()
{
RestRequest req = RestContext.request;
RestResponse res = RestContext.response;
String AccNumber = req.requestURI.substring(req.requestURI.lastIndexOf('/')+1);
Account result = [SELECT Id, Name, Phone, Website FROM Account WHERE AccountNumber = :AccNumber ];
delete result;
}
@HttpPost
global static String doPost(String name,String phone,String AccountNumber )
{
Account acc = new Account();
acc.name= name;
acc.phone=phone;
acc.AccountNumber =AccountNumber ;
insert acc;
return acc.id;
}
}
Step 3) Get Access Token by POSTMAN
3.1) Install the postman from here.
Download URL :- https://www.getpostman.com/
3.2) Generate URL
OAuth Endpoints in Salesforce
Authorization: https://login.salesforce.com/services/oauth2/authorize
Token Request: https://login.salesforce.com/services/oauth2/token
There are two way to get Access token
1) By Post Callout (Direct URL)
2) By OAuth Setting in POSTMAN (Wizard one)
3.2.1:- By Post Callout (Direct URL)
Use below link to Generate the Token for accessing SFDC
https://na50.salesforce.com/services/oauth2/token?grant_type=password&client_id=***Consumer Key_Here***&client_secret=***Consumer Secret_Here***&username=*********&password=*****password+securityToken******

NOTE:- May be After try to login you will get below error "Failed: Not approved for access"

Please check below post to resolve this issue
1) https://help.salesforce.com/articleView?id=000212208&language=en_US&type=1
2) http://amitsalesforce.blogspot.com/2017/06/failed-not-approved-for-access-in.html
Finally We have Access Token
3.2.2:- By OAuth Setting in POSTMAN (Wizard one)
- Select Type OAuth 2.0

- Then click on "Get Access Token". Then provide all below detail.

- Then click on Request Token button. Then it will ask you to enter userName and password.

- Here we have Access Token

Step 4) Test APEX REST API.
Now Copy the Access Token from above Screen. Add below detail to make get call
a. End
point URL: https://na50.salesforce.com/services/apexrest/api/Account/12345
b. Select
method as ‘GET’
c. Put
the details in header as below:
Authorization: OAuth + Access
Token

Or you can try like below as well.
Now Copy the Access Token from above Screen. Add below detail to make get call
a. Click Add Token to "Header"
b. Then select "Use Token"
c. Then select Get Method and add below URL
https://na50.salesforce.com/services/apexrest/api/Account/12345

Please check below recording for end to end POSTMAN setup
Check this post to learn about how to configure SoapUI to run SOAP API Calls.
Related Post
1) Apex REST Basic Code Sample
2) Rest API
3) Understanding the Web Server OAuth Authentication Flow
Please let us know if this will help you
Thanks
Amit Chaudhary
This comment has been removed by the author.
ReplyDeleteThis comment has been removed by the author.
ReplyDeleteBro you just shared your username and password
DeleteHello
DeleteWhat do you want??
Thanks
PK
Hello pk, you have published here the username, password, client_id and client_secret. This information can be used by others to get YOUR data. Now it is important that you will replace your password and regenerate the client credentials ASAP
Deletebtw I think your issue is you're not doing a POST (probably doing a GET or something). Plus you shouldn't have a '+' between your pw and security token (unless that's part of your pw).
DeleteGood
ReplyDelete??
ReplyDeleteinformative!!
ReplyDeleteThanks for your feedback
DeleteHello Amit, Above post is very informative and detailed.
ReplyDeleteI have an requirement where i need to execute an apex code using Rest Api without creating a Rest class or a wrapper.
Could you please help me with that.
hello bro your comment was very helpful for me to understand in apex code using Rest Apihadoop training in chennai|web designing course in chennai|php training in chennai|iot training in chennai|react training in chennai
Deleteyou have used =password+securityToken
ReplyDeleteWhat is securitytoken
how to get that
In Salesforce Classic View
ReplyDelete1) Go to My Settings –> Personal –> Reset My Security Token
2) Click Reset Security Token. The new security token is sent to the email address in your Salesforce personal settings
In Lighting Experience
1) Go to Settings –> My Personal Information –> Reset My Security Token
2) Click Reset Security Token. The new security token is sent to the email address in your Salesforce personal settings
Thank you Amit,
ReplyDeleteJust to mention that in the postman oauth2 wizard, it worked for me when in the "Client Authentication" I selected "Send client credentials in body" rather than "Send as Basic Auth header"
great
DeleteThank you Amit you saved my one day work!! Keep it up...
ReplyDeleteHi Amit,
ReplyDeleteThanks, this is generally helpful.
Still, I followed step-by-step your method in this video (https://www.youtube.com/watch?v=WdAhD6p1nKM), I got the security token correctly, but when sending the GET request I keep having in return an "errorCode":"INVALID_SESSION_ID".
I'm pretty sure my instance URL is correct (it works in Workbench!). I'm trying all this in a Sandbox of which I'm an administrator. Can the error be due to some user permissions I'm not aware of?
Hi AMit,
ReplyDeleteI get response like when I pass the id:
Now when I convert this response into list I get the parent object records but the attributes section is missed....
COuld anyone help how to convert this response so that I can store all the values....like id,Account__c,record name of the parent object record,Account__r.External_ID,createdby.name...
I converted the response to List < SObject > using
List convert= (List) JSON.deserialize(Jsonresponse, List.class);
Is there any better way .
Please help Me out
[
{
"attributes": {
"type": "Call2__c",
"url": "/services/data/v44.0/sobjects/Call2__c/a0429000004Vk6KAAS"
},
"CreatedById": "00561000002QxUWAA0",
"Id": "a0429000004Vk6KAAS",
"Account__c": "0012900000UbJ7KAAV",
"Name": "I001560070",
"CreatedBy": {
"attributes": {
"type": "User",
"url": "/services/data/v44.0/sobjects/User/00561000002QxUWAA0"
},
"Id": "00561000002QxUWAA0",
"Name": "Veeva Admin"
},
"Account__r": {
"attributes": {
"type": "Account",
"url": "/services/data/v44.0/sobjects/Account/0012900000UbJ7KAAV"
},
"Id": "0012900000UbJ7KAAV",
"External_ID": "2003904637"
}
},
{
"attributes": {
"type": "Call2__c",
"url": "/services/data/v44.0/sobjects/Call2__c/a0429000004Vk60AAC"
},
"CreatedById": "00561000002QxUWAA0",
"Id": "a0429000004Vk60AAC",
"Account__c": "0012900000UbJ7KAAV",
"Name": "I001560057",
"CreatedBy": {
"attributes": {
"type": "User",
"url": "/services/data/v44.0/sobjects/User/00561000002QxUWAA0"
},
"Id": "00561000002QxUWAA0",
"Name": "Veeva Admin"
},
"Account__r": {
"attributes": {
"type": "Account",
"url": "/services/data/v44.0/sobjects/Account/0012900000UbJ7KAAV"
},
"Id": "0012900000UbJ7KAAV",
"External_ID": "2003904637"
}
}
]
Hi Amit,
ReplyDeleteGreat job. I was able to resolve my errors following this article. Thank you.
HI Amit,
ReplyDeleteThere is small correction, in this.
The request url is:
https://salesforce_instancename/services/data/v36.0/sobjects/Account/1234
instead of
https://na50.salesforce.com/services/apexrest/api/Account/12345
Great! Awesome post, tried it worked as expected!
ReplyDelete@Amit Keep-Going.
Hi Amit,
ReplyDeleteThanks for sharing the instructions. I have created a connected app and followed your instructions but I am getting invalid_grant error while making a post call to generate token in Postman. How to resolve?
Hi Amit,
ReplyDeleteThanks for sharing the information.
In the video, I saw you use amitblog-dev-ed.my.salesforce.com/apexrest/api/ instead of https://na50.salesforce.com/services/apexrest/api/Account/12345. For me, the salesforce_instancename one didn't work. And I suppose you define amitblog-dev-ed in the setup->Site, right? After I create the site, when I make request, it will return "You do not have access to the Apex class named". When I add apex access for the site, then the amitblog-dev-ed.my.salesforce.com/apexrest/api/ can be accessed by anyone. I am wondering I didn't setup the site correctly?
Can you show me how you create amitblog-dev-ed.my.salesforce.com?
DeleteSorry, my mistake, the salesforce_instance url works. I didn't put token in the request header. And there is no need to create site.
Deletewow! cool this saved some hours, thank god I read the comments before spending a lot of time.
Deleteso base url may differ for your login. Basically it the one displayed in the URL bar when you are on the dashboard. So guys make sure it is not hardcoded to -na50.salesforce.com
Thank you!
ReplyDeleteI followed step-by-step your method in this video , I got the security token correctly, but when sending the GET request I keep having in return "message": "Session expired or invalid", "errorCode": "INVALID_SESSION_ID"
Were you able to fix it ?
DeleteHi Amit, I was able to resolve my Issues with the help of your article.
ReplyDeleteHi Amit,
ReplyDeleteI have used "https://iam-cool-dev-ed.lightning.force.com/services/apexrest/api/Account/CD656092".
I am getting errorCode": "INVALID_SESSION_ID".
Can you suggest?
As per Salesforce manual, we can expose an apex an class as REST webservice, but it does not list @HttpOptions annotation -
ReplyDeletehttps://developer.salesforce.com/docs/atlas.en-us.apexcode.meta/apexcode/apex_rest_annotations_list.htm
By any chance, could you provide sample code implementing/exposing OPTIONS http method as webservice.
Why does the generate token asks for username and password to login first and then it generates the token?
ReplyDeleteWhat is the point of accessing web service using user interaction involved in it?
Hi Amit,
ReplyDeleteI have the same situation but I won't want to setup an App as my requirement is little bit different
I am able to setup the oauth in postman using client Id and Client secret (These values were provided by the other team I am accessing the API for)
I have to write a apex class to hit the API and then create a post request using the (Logic )
I am stuck at how to generate a oauth2.0 TOKEN in the apex class. Could you please help here.
Below is what I am trying to do.
global class GD_Wootric_APIauthentication {
public String GenerateAuthToken() {
//Modify these variables
String grant_type = 'client_credentials';
String scope = 'api-full-access';
String client_id ='xxxxxxxxxxxxxxxxxxxxxxxxxxxxxx';
String client_secret = 'XXXXXXXXXXXXXXXXXXXXX';
String username = 'mayank@gmail.com.gdprod.stage';
String password = 'abc@164';
String AccessToken = '';
String AccessTokenUrl = 'https://api.wootric.com/oauth/token';
HttpRequest req = new HttpRequest();
req.setMethod('POST');
req.setHeader('Authorization', 'Basic ' + EncodingUtil.base64Encode(Blob.valueOf(client_id + ':' + client_secret)));
req.setHeader('Host','https://login.salesforce.com/oauth');
req.setHeader('content-type', 'application/x-www-form-urlencoded');
req.setEndpoint('https://api.wootric.com/oauth/token');
req.setBody('grant_type=client_credentials');
Http binding = new Http();
System.debug('Before Sending the Request'+ req);
HttpResponse res = binding.send(req);
System.debug('Response Recieved '+ res);
if(res.getStatusCode() == 200) {
JSONParser parser = JSON.createParser(res.getBody());
while(parser.nextToken() != null) {
if((parser.getCurrentToken() == JSONToken.FIELD_NAME) && (parser.getText() == 'access_token')) {
parser.nextToken();
AccessToken = parser.getText();
System.debug('The Access Token for Authorization '+ AccessToken);
}
}
}else {
System.debug('Request not Successfull '+ res.getStatusCode());
return null;
}
System.debug('Access Token is '+ AccessToken);
return accessToken;
}
}
your coding information was very helpful for me o better knowledge in thatpython course in chennai|python training in chennai|informatica data quality training in chennai|java training in chennai|salesforce training in chennai
DeleteI am getting the Postman error as "Apex REST does not support multipart/form-data requests" after clicking "Send" button. Can you please help
ReplyDeleteReally excellent content. Very easy,clear and detailed explanation.
ReplyDelete
ReplyDeletewebsite development services company in vaishali ghaziabad
7050507535 Best website designing services in Vaishali Ghaziabad
ReplyDeletewebsite development services company in Vaishali Ghaziabad
Thanks for sharing such a good and informative content to all of us.
ReplyDeleteDating site in delhi ncr
Your blog is an innovative initiative in the world of blogging. You have a unique imagination and have come up with some of the most creative ideas I've ever seen. Best of luck for your blogging journey. Keep engaging us! 2 Bedroom House for Rent
ReplyDeletethank u so much. Good info
ReplyDeleteOnline Test Series
"BEP20 Token is a unique token standard created to classify and describe tokens on the Binance Smart Chain. It is being used in numerous blockchain, NFT and DeFi applications and is becoming increasingly popular. Coin Developer India is a leading BEP20 Token Development Company
ReplyDeleteoffering cost-efficient services. BEP721 is a modification of ERC721 and BEP1155 combines BEP-20's fungibility and BEP-721's non-fungibility."
The post is very informative and helpful. Thanks For Sharing.. Backend API Development
ReplyDeleteThis comment has been removed by the author.
ReplyDeletePostman is a popular tool for testing APIs that allows users to send requests, examine responses, and automate testing. To test an API with Postman you can create a new request, select the HTTP method (GET, POST, PUT, DELETE, etc.), enter the API endpoint URL, and configure any necessary headers or parameters. You can also write tests using JavaScript in the "Tests" tab to validate the response data, status codes, and other assertions. Postman also supports collections, enabling you to organise multiple requests and run them in sequence, which is particularly useful for testing workflows and automating repetitive tasks.
ReplyDelete