Friday, 18 November 2016

Success Story of : Amy Oplinger


Welcome to my First Salesforce Success Story series. This series is focused on success story and to inspire/encourage new user/Developer. And why we should join our local Salesforce Developer/User group.


1) Your Job Title

Amy :
- Consultant, Coastal Cloud

2) Your success Story

Amy:-
I used SFDC as an end user for about 5 years in my sales career. I was lucky enough to work at a company looking to implement a CRM, and I suggested Salesforce. They made me part of the implementation team and their Super User! Learning more about the back end of Salesforce scratched an itch in my brain that sales by itself never could. I went to another company in a sales capacity, and quickly saw their SFDC instance was a mess. I took it upon myself to write up the issues I saw, how i could fix it, and how it would benefit them. My boss agreed, and made me their Administrator on the spot! While splitting my time between Admin and Sales, it became clear to me that I wanted my day to be filled with 100% Salesforce. I spoke to my manager, and because they were small, they couldn’t support a FT Admin. So, I graciously resigned, with the goal of pursuing my Salesforce dream. I put my resume online that day, and within 24 hours, I was contacted by a recruiter and immediately placed on the SFDC team at GE Lighting in Cleveland as a consultant. It was there I met the person who would become my Salesforce mentor! Learning from my mentor at GE was like being in Salesforce bootcamp; I learned a great deal very quickly. I am now happily in another consultant role, where I gain exposure to many different instances of Salesforce, each with their own unique needs. My dream of working 100% of my day in the platform came true very quickly, once I took the leap to pursue it!    

3) Why we Should Join a Salesforce User/Developer Group

Amy:-
In addition to the online Success Community, go to the Developer UG meeting. Go to the regular UG meeting. Go to the WIT UG meetings(yes, men are welcomed!)- anything to connect in person with others on the platform. These are people you will soon lean on and learn from! 
(Amit :- Totally agree with Amy. We can search our near by Salesforce Developer group from here )

4) Advice for new Salesforce Developer

Amy:-
I would tell anyone new in the field to embrace the community- admins and devs alike! You have the Success community, User Groups, and Twitter to connect with fellow Salesforcians. Use each avenue to its fullest! Don't be afraid to ask questions. I also feel it’s very important to seek out a mentor..they can talk you through when you are having doubts or feeling overwhelmed! I was lucky enough to work with mine, but the success community is so supportive, you are bound to also find many virtual mentors! (Amit:- Also please start using trailhead for leaning and developer forum for any question in salesforce)


5) Trailhead badges

137 ( Amit :- OMG )


Follow Amy on:
Twitter:
@salesforceamy
Success Profile :- https://success.salesforce.com/ProfileCertificationsAndBadges?u=0053000000BKF1zAAH


If you want to share your Salesforce Success Story, Please feel free to drop me an email :- amit.salesforce21@gmail.com

                                                                                                                    NEXT >>


Thanks
Amit Chaudhary
Twitter @amit_sfdc


Tuesday, 15 November 2016

Apex Email Service | InboundEmail Object | Messaging.InboundEmailHandler in salesforce


Email Service

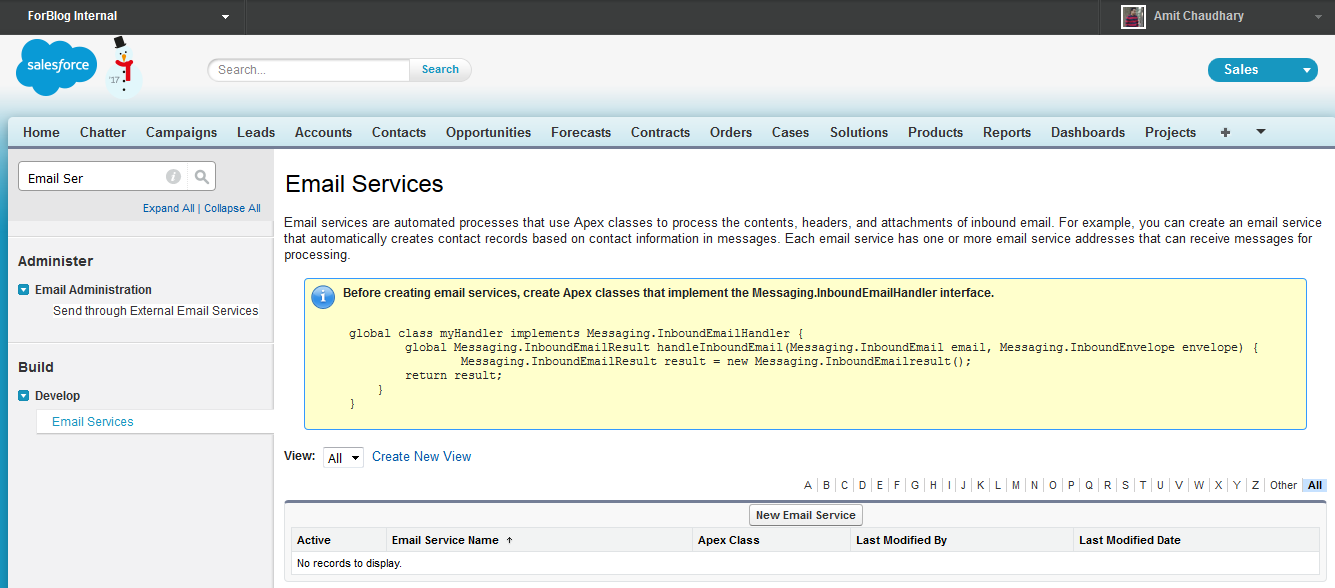
Email service is special processes that use Apex classes to process incoming email messages. When you set up an email service, we need to generate a special email address in which salesforce will receive your emails. For same we need to create one apex class to implement Messaging.InboundEmailHandler interface . The email services will then invoke a handleInboundEmail method on the Apex class whenever an email is received on the email address.


NOTE:- Before creating email services we need to create Apex classes that implement the Messaging.InboundEmailHandler interface.


STEP 1:- Create one Apex class with Messaging.InboundEmailHandler

global class EmailServiceExample implements Messaging.InboundEmailHandler 
{
 global Messaging.InboundEmailResult handleInboundEmail(Messaging.inboundEmail email,Messaging.InboundEnvelope env)
 {
  // Create an InboundEmailResult object for returning the result of the Apex Email Service
  Messaging.InboundEmailResult result = new Messaging.InboundEmailResult();
  try 
  {
   List<Contact> contList= [SELECT Id, Name, Email FROM Contact WHERE Email = :email.fromAddress LIMIT 1];
   Task taskObj = new Task();
   taskObj.Description =  email.plainTextBody;
   taskObj.Priority = 'Normal';
   taskObj.Status = 'Inbound Email';
   taskObj.Subject = email.subject;
   taskObj.IsReminderSet = true;
   taskObj.ReminderDateTime = System.now()+1;
   if(contList.size()>0)
   {
    taskObj.WhoId =  contList[0].Id;
   }    
   insert taskObj;    
  }
  catch (Exception e) 
  {
     System.debug('Exception : ' + e);
  }
  result.success = true;
  return result;
 }
}


STEP 2 :- Setup Email service

1) Go to Setup -->Develop->Email Services


2) Click on New Email Service
3) Then complete all below information


4) then click on SAVE button.

STEP 3 :- Generate an email address

1) Click on "New Email Address" button

2) Then add all below detail

 3) Then click on SAVE button.

 You will see a new email address that salesforce will monitor, emails received on this address will trigger the associated Apex code.


STEP 4 :- Testing of email service

1) Create one contact with sender email address.
2) Then send email from given email domain to same email address.


Please check next post for Apex Email Service Test class

Thanks,
Amit Chaudhary


Wednesday, 26 October 2016

First Farmington Hills Salesforce Developer Meetup


Finally we completed our first Farmington Hills Saleforce Developer Meetup on 19 Oct 2016. Our first meetup was bit more informal and we got chance to know each other and about Dreamforce 2016 also. More then 16+ Developers joined us in our first meetup ( I am very happy as more then 16+ Developers joined in our first meetup as i am also new in USA ) .

Thanks you Salesforce and Brad Mosharo to provide me a chance to become the Co-Organizer of "Farmington Hills Salesforce Developer Meetup"


Special Thanks to Eric Dreshfield­ to join us online in our first meetup. He gave some tips how to make a meetup as successful and also shared his experience about Dreamforce 2016.


Facebook Page :- https://www.facebook.com/FarmingtonHillsSfdcdug/
Meetup Link :- http://www.meetup.com/Farmington-Hills-Salesforce-Developer-Meetup/
Twitter Tag :- #FarmingtonHillsSFDCdug


Some Pic of our First Meetup

First Meetup Place :- 32737 W. Twelve Mile Rd, Farmington, MI, Farmington, MI,USA


Thanks,
Amit Chaudhary


Friday, 14 October 2016

Sales Cloud and Service Cloud


Sales Cloud :-
“When we develop product in force.com for sales then it comes in Sales Cloud Ex: - Account, Contacts, and Lead”. In different Words “ we are able to say that The Sales Cloud from salesforce.com is that the world's #1 sales application. It provides reps, managers, and execs everything they have to attach with customers and focus on what is important —more selling and fewer administration. It helps you close a lot of deals - quicker, gain period of time visibility into sales, and connect with today's social customers”.


Service Cloud :-When we need to supply some facility and additionally provides support to the clients then it comes in service Cloud. Ex: - create cases is that the example of Service Cloud within which consumer write his problem into cases rather than decision.

In different words “In service cloud when we sales product to consumer then we provides the various different types of facilities to consumer which will be helpful to consumer just like call center. In call center ,client will create a decision and ask his problem regarding product and might notice the higher answer about his problem“.


Difference between Sales Cloud and service Cloud:-

1. "Sales Cloud" refers to the "sales" module in salesforce.com. It includes Leads, Accounts, Contacts, Contracts, Opportunities, Products, price books, Quotes, and Campaigns (limits apply). It includes options like Web-to-lead to support online lead capture, with auto-response rules. it's designed to be a start-to-end setup for the entire sales process; you utilize this to help generate revenue.

While “Service Cloud" refers to the "service" (as in "customer service") module in salesforce.com. It includes Accounts, Contacts, Cases, and Solutions. It additionally encompasses features like the public knowledge base, Web-to-case, call center, and the Self-Service Portal, additionally as customer service automation (e.g. escalation rules, assignment rules). it's designed to permit you to support past, current, and future clients' requests for help with a product, service, and billing. you utilize this to help make people happy.

2. Sales Cloud Implements Sales and marketing whereas Service cloud implements Salesforce knowledge.

3. Sales Cloud ,A great solution for small and worth oriented mid-sized sales groups that need to quickly and cost effectively deploy Salesforce whereas Service Cloud   provides customer Support to the shoppers and giving you the tools to provide a better customer expertise for your clients.

 4. Sales Cloud provides you the flexibility to open Cases (issues) and relate them to Accounts, Contacts; etc. whereas The Service Cloud could be a superset of Sales Cloud, that means you get everything that's in Sales Cloud and some other features.

5. once we develop product in force.com for sales then it comes in Sales Cloud Ex: - Account, Contacts, and Lead. whereas when we need to provide some facility and additionally provides support to the clients then it comes in service Cloud. Ex: - produce cases is the example of Service Cloud in which client write his problem into cases instead of decision.


Functions in the Sales Cloud
If you’re presently using or are implementing salesforce.com’s Sales Cloud, you've got the foundation necessary to capture and resolve client questions or problems. the essential functionality includes:

Cases—you will track client inquiries, escalate problems requiring specialized support and monitor your agent’s productivity.

Solutions—Equip your client service team with the answers to your customer’s queries and even build the answers offered to the customers on the web so that they will find the answers themselves whenever they have them.

Web-to-Case—if your customers can’t notice what they’re looking for on the web, you can have them log a case directly from your web site that straightaway enters Salesforce.com for agent resolution.

Additional functionality within the Service Cloud

If you have a a lot of complicated support needs or a lot of active client service team, you ought to considerService Cloud licenses.  Service Cloud licenses provides the quality Sales Cloud practicality for your users, and add extra practicality to higher equip your team to supply service a lot of expeditiously. you'll have Sales Cloud and service Cloud users within the same instance of Salesforce.com. extra features of Service Cloud include:

Agent Console—This helps your agents access relevant info about the client with fewer clicks. you'll style the console to maximise this efficiency.

Entitlement Management—if you've got Service Level Agreements that give completely different levels of support for your customers, you'll use entitlement management to make sure that you just deliver the right service level as well as 1st response and resolution times. you'll additionally incorporate automatic processes that give directions for reps on the most effective way to resolve cases.

Access to measure Agent web Chat (additional fee on top of Service Cloud license)—Incorporate live chat from the web to make sure that your clients get answers from you in real time without a phone call

Thanks
Amit Chaudhary

Saturday, 17 September 2016

Collection in salesforce | example using LIST and MAP | When to use Map Over List | When do we use set, map, list


While working on Developer forum i found lots of question for List ,Set and Map,  like below
1) When we should use Map over the list
2) When do we use set, Map,List
3) Bulkify code with Map
4) Using Maps and Sets in Bulk Triggers
5) Use of Map in Apex class.
6) Map over list to avoid query inside for loop

Solution :-

List, Set, Map are called collections in Apex:
List : A list is an ordered collection
1) so use list when you want to identify list element based on Index Number.
2) list can contain Duplicates

EX: List<Account> accList = new List<Account>();

Set : A set is an unordered collection
1) Do not contain any duplicate elements. So, use set if you want to make sure that your collection should not contain Duplicates.

EX: Set<Account> accSet = new Set<Account>()

 
Set<String> setString = new Set<String>();
// Add two strings to it
setString .add('item1');
setString .add('item2');

Map : A map is a collection of key-value pairs 
Each unique key maps to a single value. Keys can be any primitive data type, while values can be a primitive, sObject, collection type or an Apex object.

EX: Map<Id, Account> accMap = new Map<Id, Account>();

Map<Integer, String> mapOfString = new Map<Integer, String>();
mapOfString.put(1, 'Amit');               
mapOfString.put(2, 'Rahul');              
System.assert(mapOfString.containsKey(1)); 
String value = mapOfString.get(2); 
System.assertEquals('Rahul', value);
Set<Integer> s = mapOfString.keySet();


Map<String, String> myMap = new Map<String, String>{'a' => 'b', 'c' => 'd'};


Example 1:-  Using trigger populate the Account Field on the Contact record (only insert scenario)

If we use List and not Map

Apex Class

trigger ContactTriggerWithList on Contact (before insert) 
{
Set<Id> SetAccountId = new Set<Id>(); // Use set to collect unique account ID

for(Contact con: Trigger.new) 
{
 if(con.AccountId != null) 
 {
  SetAccountId.add(con.AccountId); // add Account in Set
 }
}

if( SetAccountId.size() >0 ) 
{
 List<Account> listAccount = [ Select Id, Name, Type from Account where Id IN :SetAccountId ]; // Query Related Account
 
 for(Contact con: Trigger.new) 
 {
  if(con.AccountId != null)
  {
   for(Account acc: listAccount)
   {
    if(con.AccountId == acc.Id)
    {
     con.Type__c = acc.Type;
    }
   }
  }
 }
} 
}

 
NOTE:- In this we are using List of Accounts, Where we have to loop through the matching Account every time to populate the Type__c in the second for loop. In this case need to use nested loop.

To Above the Nested Loop We can use the Map .

Same Trigger using the Map:

trigger ContactTriggerWithMap on Contact (before insert) 
{
    Set<Id> SetAccountId = new Set<Id>();
    for(Contact cont: Trigger.new) 
 {
        if(cont.AccountId != null) 
  {
            SetAccountId.add(cont.AccountId);
        }
    }
    
    if(SetAccountId.size() > 0 ) 
 {
        Map<Id, Account> mapAccount = new Map<Id, Account>([Select Id, Name, Type from Account where Id IN :SetAccountId ]);
        for(Contact cont: Trigger.new) 
  {
            if(cont.AccountId != null && mapAccount.containsKey(cont.AccountId) ) 
   {
                cont.Type__c = mapAccount.get(cont.AccountId).Type;
            }
        }
    }
}

NOTE:- Here we are using map of Account so we can directly use the Map to get the Account record. No need of 2nd for loop here


Related Link :-
1) https://developer.salesforce.com/docs/atlas.en-us.apexcode.meta/apexcode/langCon_apex_collections.htm
2) https://developer.salesforce.com/docs/atlas.en-us.apexcode.meta/apexcode/apex_triggers_bulk_idioms.htm
3) https://developer.salesforce.com/page/Apex_Code_Best_Practices


Thanks,
Amit Chaudhary

Thursday, 8 September 2016

Setup Muliple Account for Contact | Associate a Contact with Multiple Accounts


Contacts to Multiple Accounts lets your sales reps simply manage the relationships between folks and businesses while not making duplicate records
Enable Contacts to Multiple Accounts, modify page layouts, and customise your connected lists thus your sales reps will simply track relationships between individuals and also the businesses they work with

NOTE:- If you disable Contacts to Multiple Accounts, confine mind that doing thus deletes all indirect account-contact relationships. Associations between a contact and its primary account stay.
 

Setup Muliple Account for Contact 

1) Click on Setup, enter Account Settings in Quick Find, then choose Account Settings.


2) choose permit ""

3) Add Contacts related list to the account page layouts that your reps use.

(Above image is used from trailhead module)

4) Add the Related Accounts list to the contact page layouts your reps use.


How to use

Step 1:- Click on Account object and go to "Related Contacts" Related list.


Step 2:- Click on Add Relationship button


Step 3:- Save.


For more detail please check below post :-
1) https://releasenotes.docs.salesforce.com/en-us/summer16/release-notes/rn_sales_shared_contacts.htm

2) https://trailhead.salesforce.com/admin_intro_accounts_contacts/admin_intro_accounts_contacts_relationships

Thanks
Amit Chaudhary

Friday, 26 August 2016

Live Agent Implementation | Setting up live Agent in Salesforce


What is Live Agent

Now days customers expect fast replies and quick resolutions. With Live Agent web chat, We can give them quicker responses to their queries. Live Agent provide users the ability to interact with the agents through web chat to get more information about specific product or queries

Process 1) Follow below Step to Setup Live Agent 

Step 1 :- Open live Agent Setting
Customize --> Live Agent----> Live Agent Setting


Step 2:- Enable Live Agent 
Click on Enable Live Agent Chat Box and click on save button


Once you will enable the Live Agent below object will auto created in your org.
  1. Live Chat Visitors
  2. Live Chat Transcripts
  3. Live Chat Transcript Events
  4. Live Agent Sessions
  5. Live Agent Supervisor
  6. Live Agent
  7. Quick Text
Step 3:- Setup Live Agent User.

Setup--> My Setting -> Advanced User Details--> Then click on Live Agent User checkbox


Step 4:- Set Skill

Click on Setup --> Live Agent --> Skill


 Then Click on new button and setup skill like below screen


Step 5:- Upload Online and Offline Image

Upload online and offline image in "Static Resource"


Step 6:- Setup Chat Buttons & Invitations

Setup--> Customize -->Live Agent --> Chat Button & Invitation.


then click on New Button. And add all below detail


Once you will click on Save button the chat button code will come

Copy Above Script and keep with you

Step 7:- Create Deployment

Click on Setup-> Customize --> Live Agent--> Deployments


Then click on New button and provide all below detail


Then click on Save button. After Saving Deployment code will come like below


Copy the Deployment code.

Create the HTML page with Chat Button Code (Step 6) and Deployment Code.


NOTE:- First you need to copy Chat Button Code then Deployment Code.

Now you all Set with live Agent Configuration

Process 2) Now Setup the Agent Console ( Console App )


Step 1:- Open App Wizard
Setup--> Create --> App


Step 2:- Create new Console App

Click on new button then select console button


While creating the App on Step 6 select the "Include Live Agent in this App" check box like below


Now All Set. We can test the same now


Process 3) How To Test

Click on HTML page which you created in process 1 Step 7.

Once you page will open and Agent is not online the below Html page will show you offline image


Once Agent will come online from agent console then image will change on client HTML page

How Agent will come online

Step 1:- Select Live Agent Console App


Step 2) Then from the Live Agent Click on Online button


Now All Set Agent is online :)

Step 3) Refresh you HTML page
Once Agent will login the HTML will show you online image like below


Then click on Image the set session will start.


Accept chat from agent console


Thanks,
Amit Chaudhary